
If you manage a WordPress site with multiple user roles, you may have noticed that non-administrator users cannot access the Issues Explorer or other global reports. By default, Accessibility Checker restricts many reports and controls to administrators; however, some organizations may want to allow users with lower permission levels to view reports and take action on them.
Accessibility Checker’s Permissions settings lets you control which user roles can dismiss issues, run full site scans, open the Issues Explorer, view Audit History, and export data.
Where to Find Permissions
Location in Settings
You can find Permissions controls in Accessibility Checker Settings.
- Log in to your WordPress admin as an administrator.
- Go to Accessibility Checker > Settings.
- Select the Permissions tab.
- Choose a user role from the Role dropdown to reveal settings for that specific role.
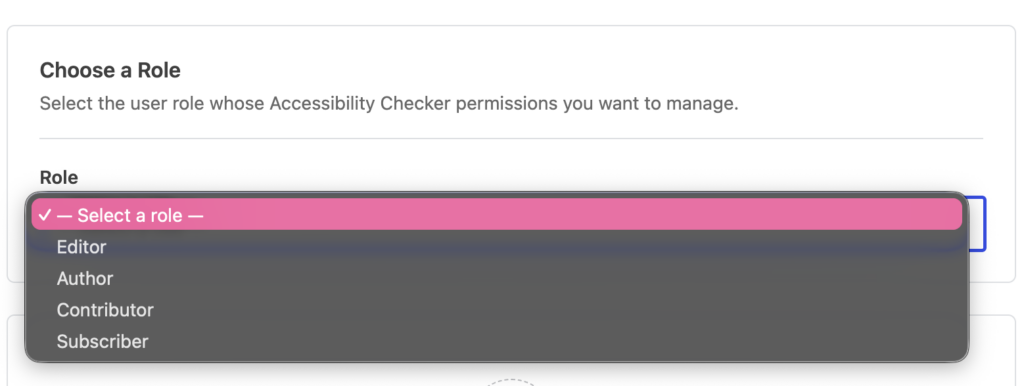
Requirements to access
Must be an administrator
To access and modify Accessibility Checker settings, including permissions settings, you’ll need administrator access. You must be logged in as a WordPress user with either the default administrator user role or a custom user role that has the manage_options capability.
Minimum plugin version
Permissions controls were introduced in the following plugin releases:
- Accessibility Checker version 1.48.0
- Accessibility Checker Pro version 2.3.0
- Accessibility Checker Export version 1.5.0
- Accessibility Checker Audit History version 1.6.0
You must have these versions, or a later version of the plugin(s) active to access permissions settings.
How Permissions Work
After choosing a role to edit, you’ll see available capabilities grouped by their related plugin.
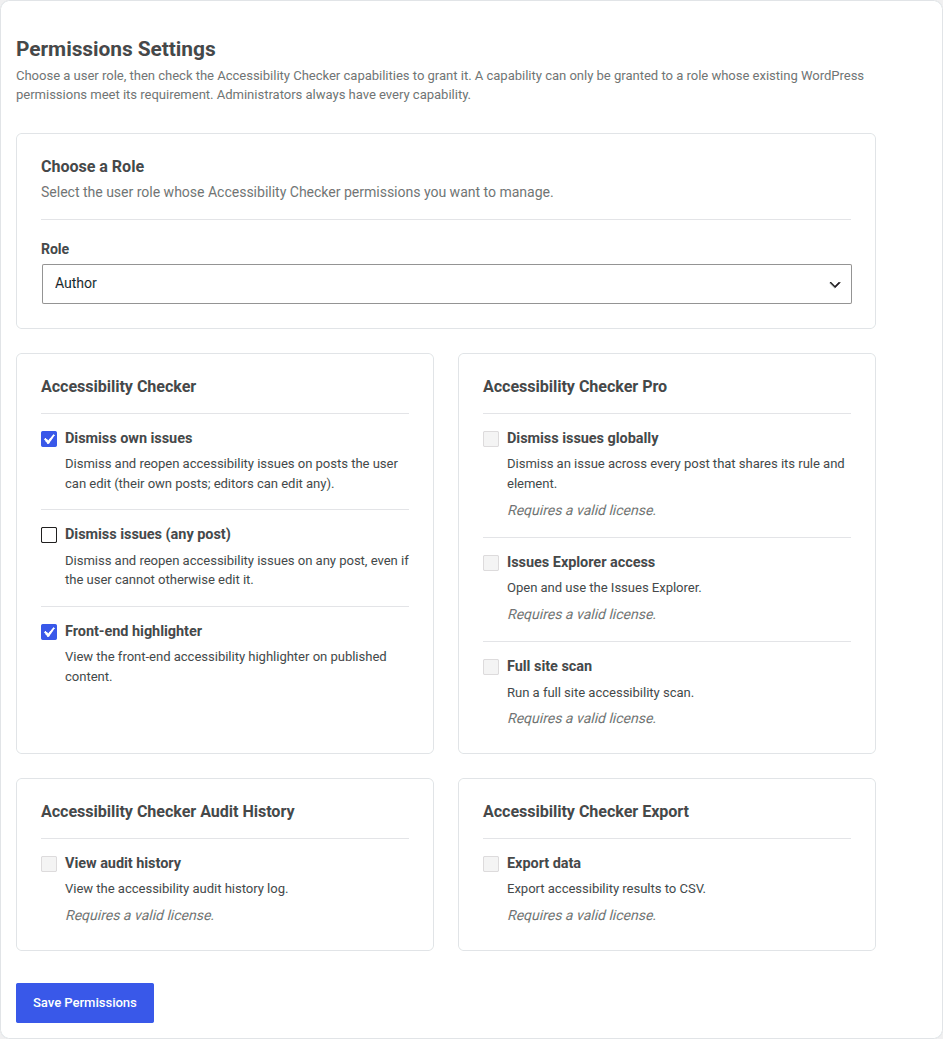
Each capability has a checkbox: checked if the user role has the capability, unchecked if it doesn’t.
How to change capabilities
- Log in to your WordPress admin as an administrator.
- Go to Accessibility Checker > Settings.
- Select the Permissions tab.
- Choose the user role from the Role dropdown that you want to edit.
- Check or uncheck the box for any capabilities you want to add or remove.
- Click the Save Permissions button.
Available Permissions
Here’s what you can control for each role:
Accessibility Checker (free plugin)
- Dismiss own issues: Dismiss and reopen issues on posts the user created or that they can edit.
- Dismiss issues (any post): Dismiss and reopen accessibility issues on any post, even if the user cannot otherwise edit it because they are not the post’s author.
- Front-end highlighter: View the front-end highlighter on the live view or preview of a page or post on the site.
Accessibility Checker Pro
- Dismiss issues globally: Dismiss an issue across every post that shares its rule and element.
- Issues Explorer access: View the dedicated app for browsing every open issue across the whole site.
- Full site scan: Can run a full site accessibility scan.
Audit History add-on
- View Audit History: View the historical accessibility trend report (graph and table).
Export add-on
- Export data: Can export issues, scan stats, global ignores, and audit history data to CSV reports for sharing outside the WordPress admin.
FAQs for Permissions
Why can’t I edit the administrator role?
Administrators have full access to Accessibility Checker by default, and you can’t change their capabilities on the Accessibility Checker Permissions settings page. This is intentional to prevent an Administrator from accidentally removing access to important plugin settings or views, which could make it difficult to manage or restore access later.
If you want to limit what a user can do in Accessibility Checker, assign them a different WordPress user role and customize the permissions for that role.
Will this work with custom user roles?
Yes, you can modify Accessibility Checker permissions for any user role registered on your website.
If a plugin has registered a new user role, or you created one with a user role editor plugin, that role will appear in the role select, and you can customize what that role can or cannot do.
Note: If your custom user role has the manage_options capability, it will not appear in the user role dropdown. This is because users with the manage_options capability function as administrators and already have full access to everything in Accessibility Checker.
Why is a checkbox disabled?
Every so often you’ll try to grant a capability to a role and find the checkbox disabled. When this happens, the reason appears below the checkbox on the permissions settings page.
There are two reasons why you may not be able to edit a capability for a role:
Missing baseline permissions
You can’t grant a permission if the role doesn’t meet the baseline for that capability. A few capabilities require a role to already have a certain WordPress capability before Accessibility Checker layers extra access on top of it.
For example, dismissing an issue everywhere it appears on the site (Dismiss Globally) requires the role to already be able to edit other people’s posts.
Here is a table showing the Accessibility Checker capability along with its baseline WordPress capability.
| Capability | Capability slug | Required WordPress capability |
|---|---|---|
| Dismiss own issues | edac_dismiss_own_issues | edit_posts |
| Dismiss issues (any post) | edac_dismiss_issues | edit_posts |
| Dismiss issues globally | edac_dismiss_issues_globally | edit_others_posts |
| Issues Explorer access | edac_issues_explorer_access | edit_posts |
| Full site scan | edac_full_site_scan | edit_others_posts |
| View Audit History | edac_view_audit_history | edit_posts |
| Export data | edac_export_data | edit_posts |
| Front-end highlighter | edac_view_frontend_highlighter | (none) |
Accessibility Checker tests baseline capabilities against what a role can actually do, so if you’ve customized any default roles with another plugin, Accessibility Checker respects the customized version.
Missing license
The second reason why a capability may be disabled is if it is for an add-on that isn’t licensed.
Accessibility Checker Pro, Export, and Audit History capabilities stay disabled if that add-on’s license isn’t currently active, just as the rest of that add-on’s features are unavailable without one.
What happens on install or upgrade?
Default permissions for new websites
When Accessibility Checker is newly installed, the plugin lets Authors, Contributors, and Editors dismiss issues on content they can already edit, and gives Authors and Editors the front-end highlighter.
Everything else (full site scans, the Issues Explorer, Audit History, exporting data, dismissing globally, dismissing any issue site-wide) is disabled for every role. Go to the permissions settings page to modify this as needed.
Administrators always have full access; that’s built in, not something you configure.
Permissions for upgrades
If you’re upgrading from an older version or Accessibility Checker that used the “Ignore Permissions” setting, nothing changes automatically. You keep exactly the access that setting gave your roles. A role won’t unexpectedly gain the front-end highlighter or full site scans just because you updated the plugin.
Same story for add-ons. When you activate Accessibility Checker Pro, Export, or Audit History on a site that’s already running, its capabilities are turned off for every role except administrators.
You decide who gets it. Deactivate that add-on later and the access you configured for it doesn’t disappear. Turn it back on and your roles are exactly where you left them.
Can I change permissions for only one individual person?
Permissions are assigned to roles, not individual users. There’s no built-in “give this to just one Editor” screen.
If you need to give one specific person access without changing what the rest of their role can do, your developer can use WordPress’s own per-user capability functions ($user->add_cap() / $user->remove_cap()) in a site-specific plugin.
You can also use a user role manager plugin, such as User Role Editor, if you prefer to do it without code changes. This works safely alongside the Permissions tab: a capability added directly to a user’s account is stored separately from what their role grants them, so changing one never touches the other.
Note: Permissions Don’t Travel with Settings Copies or Exports
If you manage more than one site, note that permissions are not included in a settings clone or export. That’s intentional as permissions are security-sensitive.
Multisite add-on
The Multisite add-on’s Settings Management page lets you copy Accessibility Checker settings from one site to others on your network, but it does not copy permissions. Because it doesn’t clone security-related settings, you’ll need to configure Permissions Settings on each site manually.
Accessibility Checker Pro
Pro’s Import/Export Settings works the same way. Exporting your configuration to load onto another site doesn’t carry permissions with it.
Who’s allowed to dismiss issues, run scans, or export data is specific to each site’s own team, and it stays that way for a reason: a settings copy or import should never silently hand out (or take away) that kind of access on a site it wasn’t set up for. Configure the Permissions tab separately on each site.