
The Import/Export Settings feature in Accessibility Checker Pro lets you copy accessibility configurations between WordPress sites, making it ideal for agencies, developers, and teams managing multiple sites.
Added in Accessibility Checker Pro 1.22.0, import/export lets you save your complete plugin configuration to a JSON file and load it on any other site running the Pro plugin. One export file can apply the same scanner settings and one-click fix configuration to dozens of sites in minutes.
Requirements
- Accessibility Checker Pro must be active on both the source site (where you export) and the destination site (where you import).
- Administrator access – you must be logged in as a WordPress user with the
manage_optionscapability (site administrator).
Where to Find Import/Export Settings
In your WordPress admin, go to Accessibility Checker > Settings and click the Import / Export tab. It is the fourth tab in the settings navigation.
The tab displays two side-by-side panels: Export Settings on the left and Import Settings on the right.

How to Export Your Settings
- Go to Accessibility Checker > Settings > Import / Export
Under Export Settings, review the two checkboxes, both are checked by default:
- Include settings: all plugin configuration (scan targets, display options, accessibility statement settings, and more)
- Include fixes: the on/off state of every one-click automated fix
- If you only want to export one or the other, uncheck the one you do not need.
- Click Download JSON Export

A file named accessibility-checker-pro-settings-YYYY-MM-DD.json downloads to your computer. Keep this file, you will upload it to the destination site.
What the exported file looks like
Here is an example of its structure:
{
  "plugin": "accessibility-checker-pro",
  "version": "1.22.0",
  "exported": "2026-04-27T01:00:00+00:00",
  "groups": ["edac_settings"],
  "settings": { ... },
  "fixes": { ... }
}
The settings key contains all plugin configuration values. The fixes key contains all one-click fix states. Either key may be null if you unchecked that section during export.
What is included in the export
Settings
The export includes all options registered in the plugin’s settings group. This covers both free and Pro settings, such as the Post types to scan, full site scan speed, where the frontend highlighter appears, and others.
Every setting from the plugin should be exported in the file, except for settings related to license keys, described below.
Fixes
The export includes the enabled/disabled state for all one-click automated fixes, as well as any custom settings you have configured for the skip link selectors.
What is not included in the export
The following are deliberately excluded from every export:
- Pro license key and status: Security. Must be activated separately on each site
- Equalize Digital account dashboard connector options: Site-specific. Requires re-connection on the destination site
License keys and integration credentials are not included in exports. They are site-specific and must be entered separately on each site.
How to Import Settings
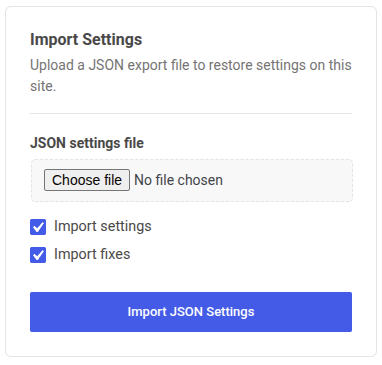
- Go to Accessibility Checker > Settings > Import / Export on the destination site.
- Under Import Settings, click the file upload field and select your exported
.jsonfile. Review the two checkboxes; both are checked by default:
- Import settings
- Import fixes
- Uncheck either option if you only want to import one section.
- Click Import JSON Settings.
A notice appears at the top of the page confirming whether the import succeeded.

Before you import: Consider exporting the destination site’s current settings first. Import replaces existing settings with no undo option. An export gives you a backup to restore from if needed.
Understanding import status messages
The Import and Export feature may display different notices depending on the most recent operation. Here is the explanation of what each one means.
| Status Message | What it means |
|---|---|
| “Settings were imported successfully.” | All selected settings and/or fixes were imported without errors. |
| “Unable to import settings. Please upload a valid JSON export file.” | The file could not be read or is not a valid export from Accessibility Checker Pro. Check that the file was exported from the Pro plugin and has not been modified. |
| “No matching settings or fixes were imported. Please check that at least one import option is selected and that the file contains that section.” | The import ran but found nothing to import. This happens if, for example, you exported settings-only but checked “Import fixes”. Verify your checkbox selections match the sections in the file. |
Important Limitations
Here are some limitations to be aware of:
- Import overwrites. There is no merge. Each imported setting replaces the existing value. There is no way to diff or selectively merge. Use the export-first approach as a backup strategy.
- License key must be re-entered. Your Pro license key is not transferred. Activate your license on each destination site after import.
- Reconnect integrations. If your site uses the Equalize Digital account dashboard connector or other integrations, you must reconnect them on the destination site after import.
- The file must come from the Pro plugin. The import validates the file source. A JSON file exported from a site running only the free plugin will be rejected.
- Partial import is supported. You can import settings without fixes or fixes without settings by unchecking the relevant box.
Common Use Cases
Staging to Production
Configure Accessibility Checker Pro on your staging site, test your settings, then export. Import that file on your production site to deploy the verified configuration without re-entering everything manually. Remember to check the Accessibility Policy Page setting after import.
Setting Up Multiple Client Sites
If you manage accessibility for several client sites on the same standards, export a baseline configuration from one site and import it on each new client site during setup. This ensures consistent scan targets, fix states, and display preferences across all properties without manually configuring each site from scratch.
Organization Configuration Templates
Build a template configuration that represents your accessibility baseline: scan settings tuned to your typical content types, fixes that align with your usual front-end patterns, and statement settings pre-configured. Export that template and use it to jumpstart new Accessibility Checker setups.
Pre-Update Backup
Before making significant changes to your Accessibility Checker settings, such as enabling new fixes or adjusting scan scope, export your current configuration first. If the changes do not work as expected, you have a restore point.