If your business or organization is located in the United States, you may be familiar with The Americans with Disabilities Act (ADA), a federal law that protects people with disabilities from discrimination.
Most of us know the ADA as it applies to the physical world. It’s what requires buildings to have ramps for wheelchair users and accessible parking spaces. It allows people to bring service animals in public places, guarantees reasonable accommodation in the workplace, and more.
But it’s not always clear how or even if the Americans with Disabilities Act applies to websites, especially for certain organizations. Many website owners have questions about how to ensure their website is “ADA compliant.”
If you don’t know where to start, or even if the ADA applies to your website, read on for key information about the Americans with Disabilities Act and a helpful ADA compliance checklist to see if your website is accessible.
Stay on top of web accessibility news and best practices.
Join our email list to get notified of changes to website accessibility laws, WordPress accessibility resources, and accessibility webinar invitations in your inbox.
What is the ADA?
The ADA, or Americans with Disabilities Act, is a United States federal civil rights law that prohibits discrimination against people with disabilities in everyday activities. The Act was signed into law on July 26, 1990, by President George Bush. It was the result of the hard work of many thousands of people across the country who built a disability rights movement beginning in the early 1970’s.
What the ADA Covers
There are five sections, called “titles,” that make up the ADA. Each title details the ways in which accessibility applies to different kinds of organizations and civil rights. These include:
- Employment (Title I)
- State and local government and public services such as transportation (Title II)
- Businesses and nonprofits that are open to the public (Title III)
- Telecommunications (Title IV)
- Requirements for Implementing the ADA (Title V).
When people discuss the ADA as it applies to websites, they typically refer to Title III, which applies to businesses and nonprofits, or Title II, which applies to all services, programs, and activities of state and local governments.
Does my business need to comply with the ADA?
Any businesses or nonprofit organizations that provide goods or services to the public are required to be ADA-compliant. These are called “public accommodations” in Title III of the law.
Examples of Businesses that Need to be ADA-compliant
The ADA provides specific examples of businesses and nonprofits considered public accommodations, including:
- Restaurants
- Hotels
- Retail stores
- Movie theaters
- Private schools (including housing)
- Doctors’ offices and hospitals
- Daycare centers
- Gyms
- Organizations offering courses or examinations
- Private transportation, such as taxis, buses, or shuttles
- Commercial facilities, including office buildings, warehouses, and factories
The original law provided the above examples. In 2010, after 20 years of the ADA, the US Department of Justice further clarified the ADA and how it applies to small businesses. This 2010 Standard states that the ADA applies to both the built environment (a.k.a buildings, sidewalks, and physical spaces) and also to the policies and procedures that affect how a business provides goods and services to its customers.
This reference to policies and procedures, is one indication that the ADA applies to websites.
No Exceptions for Small Businesses
Some laws in the United States only apply to businesses with more that 50 employees or over a certain revenue threshold. This is not the case with the Americans with Disabilities Act.
Nearly all types of businesses that serve the public are included in the 12 categories, regardless of the size of the business or the age of their buildings.
ADA Update: A Primer for Small Business
The ADA applies to all businesses, even very small businesses or nonprofits that are just starting out. If your business does not have a large budget, there is some flexibility in how accommodations can be provided, but you cannot refuse to serve or accommodate a disabled person.
How the ADA Defines Disability
The ADA protects people who meet the federal government’s definition of disability, which is as follows:
For the purposes of federal disability nondiscrimination laws (such as the Americans with Disabilities Act (ADA), Section 503 of the Rehabilitation Act of 1973 and Section 188 of the Workforce Innovation and Opportunity Act), the definition of a person with a disability is typically defined as someone who (1) has a physical or mental impairment that substantially limits one or more “major life activities,” (2) has a record of such an impairment, or (3) is regarded as having such an impairment.
Office of Disability Employment Policy
The disabilities covered by the ADA are wide-reaching, and the law does not list them all out.
Some disabilities covered by the ADA are “visible” disabilities such as blindness or vision loss, deafness or hearing loss, and mobility disabilities that require the use of a wheelchair, walker, or cane.
Other disabilities covered by the ADA are “hidden” or “invisible” disabilities you may not be aware of when you look at someone. Examples of hidden disabilities covered by the ADA include depression, post-traumatic stress disorder (PTSD), epilepsy, or cognitive disabilities such as dyslexia.
The disabilities covered by the ADA are ones that people are born with and also disabilities that happen as a result of accidents, illness, life events, or aging. Some illnesses, such as HIV and cancer, are considered disabilities under the ADA.
How does the ADA apply to websites?
Title III of the ADA, which was originally published in 1991 and updated in 2010, prohibits discrimination against persons with disabilities in places of public accommodation. The Title states:
No individual shall be discriminated against on the basis of disability in the full and equal enjoyment of the goods, services, facilities, privileges, advantages, or accommodations of any place of public accommodation by any private entity who owns, leases (or leases to), or operates a place of public accommodation.
ADA Title III
The ADA does not specifically mention websites, but multiple web accessibility lawsuits have been filed and won under Title III.
After the 2010 standards were published, Title III’s anti-discriminatory policies were increasingly applied to websites. In recent years, case law established a precedent that websites are understood to be places of public accommodation, and in their 2022 guidance on website accessibility, the U.S. Department of Justice explicitly stated:
[T]he Department has consistently taken the position that the ADA’s requirements apply to all the goods, services, privileges, or activities offered by public accommodations, including those offered on the web.
ADA Web Guidance
See examples of ADA website accessibility lawsuits in our “ADA Compliance and Your Website” article.
How do I know if my website has to meet ADA compliance standards?
As stated above, case law has set a precedent that private business and nonprofit websites must be accessible under Title III of the ADA. So, if you’re asking the question: does my website have to be ADA-compliant? The short answer is yes, all public websites must be accessible under the ADA.
Depending upon your industry, you may also be required to meet additional compliance standards. For example, federal, state, and local government websites are required to meet both ADA and Section 508 standards for accessibility.
Your ADA Compliance Checklist
To ensure that your website is ADA-compliant, follow these 10 steps.
1. Read the ADA requirements
The first step in ADA compliance is to read the resources on the Americans with Disabilities Act website. The US federal government has provided multiple resources to help you understand the ins and outs of the act and how it applies to your organization.
Here are some recommended resources to review:
- ADA Update: A Primer for Small Business
General guidance to assist small businesses in understanding and complying with the ADA’s requirements. - ADA Title III Technical Assistance Manual
A web page explaining what businesses and nonprofits must do to ensure equal access to their goods and services for people with disabilities. - Guidance on Web Accessibility and the ADA
Resource published in 2022 for businesses, nonprofits, and state and local government website accessibility.
If you have legal questions after reading through the ADA website, you may also want to consult an attorney.
2. Determine which guidelines you will check against
After reading the ADA in full, you will want to test your website for ADA compliance. However, before you can begin testing, you will need to determine which guidelines to check against.
Unfortunately, the ADA does not explicitly identify how websites can be determined to be made accessible. Rather, there is flexibility for your organization to determine how it wants to measure and ensure accessibility.
At Equalize Digital, we test all websites against Web Content Accessibility Guidelines (WCAG). WCAG is referenced in the web accessibility guidance on the ADA website, and is currently the best internationally recognized measure of digital accessibility. Our accessibility audits test for WCAG 2.2 A, AA, and AAA levels of conformance, and we recommend making your website WCAG-compliant as the best way to ensure ADA compliance.
Depending upon your specific website and needs, your website may need to meet WCAG AA or AAA conformance or a combination of the two.
Once you have decided which guidelines you will use, you can start the testing process.
3. Publish an accessibility statement
Depending on your budget and the number of issues on your site, it may take several months to make all the key elements in your website’s user journey accessible. While you are working to improve the accessibility of your website, it is important that users with disabilities know how they can request support or accommodation under the ADA.
Adding an Accessibility Statement to your website and linking to it in the footer of every page is an easy way to notify people that you are striving to meet your requirements under the ADA. Make sure to provide a telephone number or email address so people can request assistance, and establish procedures for responding quickly to these requests.
If you aren’t sure how to write an accessibility statement, you can review our accessibility statement as an example.
If you have a WordPress website, installing our free Accessibility Checker plugin on your WordPress site will create a draft Accessibility Statement that you can modify and publish.
4. Perform an automated accessibility scan
We recommend starting your ADA compliance journey by running an automated accessibility scan of your website. Many accessibility problems can be detected by an automatic tool. Some of these items include:
- Images with empty alternative text
- Skipped heading levels
- Insufficient color contrast
- Empty links
- Empty buttons
- Ambiguous links
Doing an automated scan will provide you with a quick understanding of some common accessibility errors that may exist on your website. This allows you to get an initial look at the scope of problems and whether they can be fixed in the editor or need to be fixed by a developer.
Test with Equalize Digital Accessibility Checker
For WordPress websites, the top recommended free accessibility testing tool is our Accessibility Checker plugin.

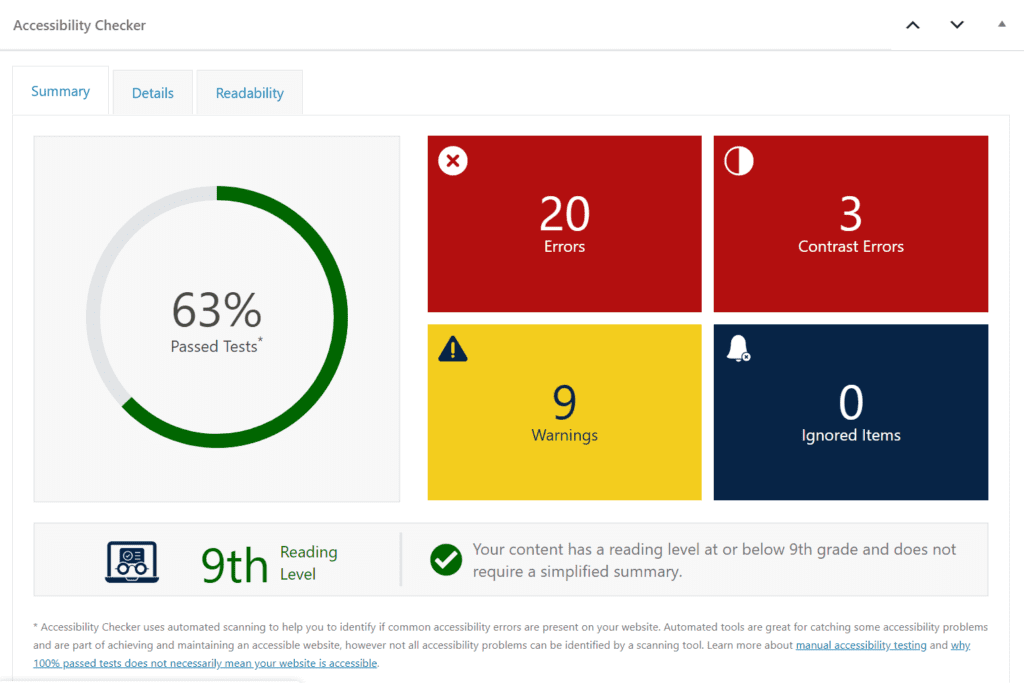
Accessibility Checker is a plugin that provides accessibility error and warning notifications right on your post and page edit screens. You can scan unlimited posts and pages, one at a time, with our free plugin. The paid version includes full-site scans and reports.
When you scan your website with Accessibility Checker, you will receive a visual overview of how your content stacks up against more than 40 different accessibility checks created to meet Web Content Accessibility Guidelines (WCAG) 2.1 success criteria. Each item is identified as an error or warning depending upon its severity so that you can prioritize fixes. With our Audit History add-on, you can track progress over time.
Test with Browser Extensions
If you don’t have a WordPress website, you can test for accessibility problems using the WAVE or axe browser extensions. These automated scanners test one page at a time and are great tools, though they don’t save a history of accessibility issues over time, so you’ll want to screenshot them or otherwise record their results if you need to track your efforts to work toward accessibility and ADA Compliance.
5. Manually review flagged accessibility errors
There are a number of issues that come up in automated scans that will require manual review.
In Equalize Digital Accessibility Checker, anything flagged as a “warning” is something that requires human review. It may be a problem that requires a fix, or it may be OK and can be safely ignored.
One example of an accessibility issue that requires manual review is empty alternative text. Automated scanning tools can quickly list out every image on your website that is missing alternative text. This seems like a pretty straight-forward accessibility error, but not all images are supposed to have alternative text. If an image is purely decorative, you don’t want to add alt text to it just to have something there.
Whoever reviews these items should have a good level of accessibility knowledge and an understanding of WCAG.
6. Fix all items identified through automated testing
After running Accessibility Checker or another automated accessibility testing tool on your website, go through each page, working from most to least important, and fix the accessibility problems that it identified.
We recommend starting with these areas:
- Global elements such as the header and footer.
- Elements key to the user journey, including cart, checkout, and form pages.
- Privacy policy, Terms of Service, and other legal pages.
- High-traffic pages that bring many people to your website or that you use as ad landing pages.
After improving the key user journey areas of your site, you can prioritize fixing problems on other posts and pages to work towards making your full-site accessible.
7. Perform keyboard navigation testing
Once you have resolved all issues found through automated accessibility testing, it’s time to do some manual accessibility testing. While automated tools are a great place to start, most experts believe that only 30-40% of accessibility problems can be identified automatically. This is where manual accessibility testing comes in.
The first step in manual accessibility testing is to perform a keyboard navigation test. To perform keyboard navigation testing, load your website, and then use only the keyboard (typically the Tab key, arrow keys, Return/Enter key, and the Space bar) to move through every page and interact with every feature.
You should be able to do everything that you would do on the website with a mouse, with a keyboard alone.
8. Test with screen readers
People who are visually impaired will use a screen reader to browse and interact with your website. To ensure true accessibility and ADA-compliance, a website needs to be tested with screen readers to ensure it sounds good and makes sense to people who are blind or have low-vision.
Three of the most common screen readers are VoiceOver, NVDA, and JAWS. VoiceOver comes built into Mac devices. NVDA is free to download online and use. JAWS is a paid screen reader. We recommend testing your website with NVDA on Windows and VoiceOver on Mac.
Follow the same process that you did for manual testing with a keyboard, only with a screen reader turned on and listen for anything that sounds confusing, incorrect, or
9. Fix problems from manual testing
After finishing manual tests, you’ll need to fix problems that were identified. Like with issues identified by automated tests, prioritize global elements or key elements and paths in the user journey. You want to make it as easy as possible for people to do what you want them to do on your website, whether that’s buying a product, registering for an event, or filling out a contact form.
10. Conduct user testing
After you have resolved all accessibility issues that you can identify yourself, you should conduct user testing. Hiring people with a variety of disabilities to review your website and provide feedback is the best way to confirm that your website is ADA-compliant.
Learn more about our approach to accessibility user testing or contact us for more information if you would like assistance with user tests.
What If I Can’t Perform Manual Testing Myself?
If you cannot perform your own manual accessibility review and testing procedures because of budget, time, or knowledge constraints, it may be worth hiring an accessibility consulting firm with trained accessibility experts, like Equalize Digital.
Our team of consultants will be able to manage your entire ADA compliance checklist from beginning to end – you don’t have to worry about a thing. Contact us today to discuss our accessibility offerings or request a free assessment to find out right away what WCAG and ADA compliance errors exist on your website.

