When you started reading about website accessibility, you might have felt overwhelmed or had no idea where to start. While there are many parts of making a website accessible that require technical or developer-level skills, you don’t have to be a web accessibility expert to start testing your website for accessibility. This is our getting started guide to easy accessibility testing.
Many user-friendly, free tools are available that empower anyone, regardless of their technical capabilities, to conduct meaningful accessibility tests. These tools can be included in your WordPress website or added as an extension in your browser. There are also easy keyboard tests that you can perform to see if problems exist on your website.
If you’re unsure if your website complies with accessibility laws or has problems that need fixing, read on for easy ways to find out.
Start with Our Accessibility Checker WordPress Plugin
Equalize Digital Accessibility Checker is an automated accessibility scanning plugin that helps your WordPress website become and stay accessible. It is the easiest way to start testing your website for many accessibility problems – and requires only a click of a button.
How Equalize Digital Accessibility Checker Helps
When you install the Accessibility Checker plugin on your website, it dynamically scans and reports on the accessibility status in real-time as content, themes, and plugins are updated.
With reports native to the WordPress admin, Accessibility Checker fits into your existing processes and offers numerous powerful features to help individuals and teams maintain accessibility standards across virtually any WordPress site.
Even if you’re not a developer, you can install Accessibility Checker and look at its reports to see how many problems may exist on your site. These reports can be handed off to your developer as a list of things you want them to address.
Article continued below.
Stay on top of web accessibility news and best practices.
Join our email list to get notified of changes to website accessibility laws, WordPress accessibility resources, and accessibility webinar invitations in your inbox.
Accessibility Checker Free
The free version of Accessibility Checker includes unlimited scanning of WordPress posts and pages. In this version of the plugin, accessibility tests run every time you hit the “Save Draft,” “Update,” or “Publish” button on a post or page. Reports are visible on the edit screen below your content and on the website’s front end. It’s compatible with major page builders, including Elementor, Beaver Builder, Bricks, Divi, and more.
If your organization has a simple brochure site, you can use Accessibility Checker for free forever. There are no limits on the number of posts or pages you can scan or the number of tests in the free plugin.
If you’re new to accessibility testing, the free Accessibility Checker plugin is a great place to start.
How to Use Accessibility Checker in WordPress
1. Install the Plugin
To start using Equalize Digital Accessibility Checker free, follow these steps to install and activate it on your website:
- Go to the admin area of your WordPress website by visiting “yoursite.com/wp-admin” and log in with administrator credentials.
- In the WordPress dashboard, find and click on “Plugins” in the left-hand menu.
- On the Plugins page, click on the “Add New” button.
- In the search bar, type “Equalize Digital.”
- Find the “Equalize Digital Accessibility Checker – Audit Your Website for WCAG, ADA, and Section 508 Accessibility Errors” plugin in the search results.
- Click the “Install Now” button for the Accessibility Checker plugin.
- After installation, click the “Activate” button to activate the plugin.
Alternatively, you can download a free zip file of Accessibility Checker here to upload to your website manually.
2. Start Testing
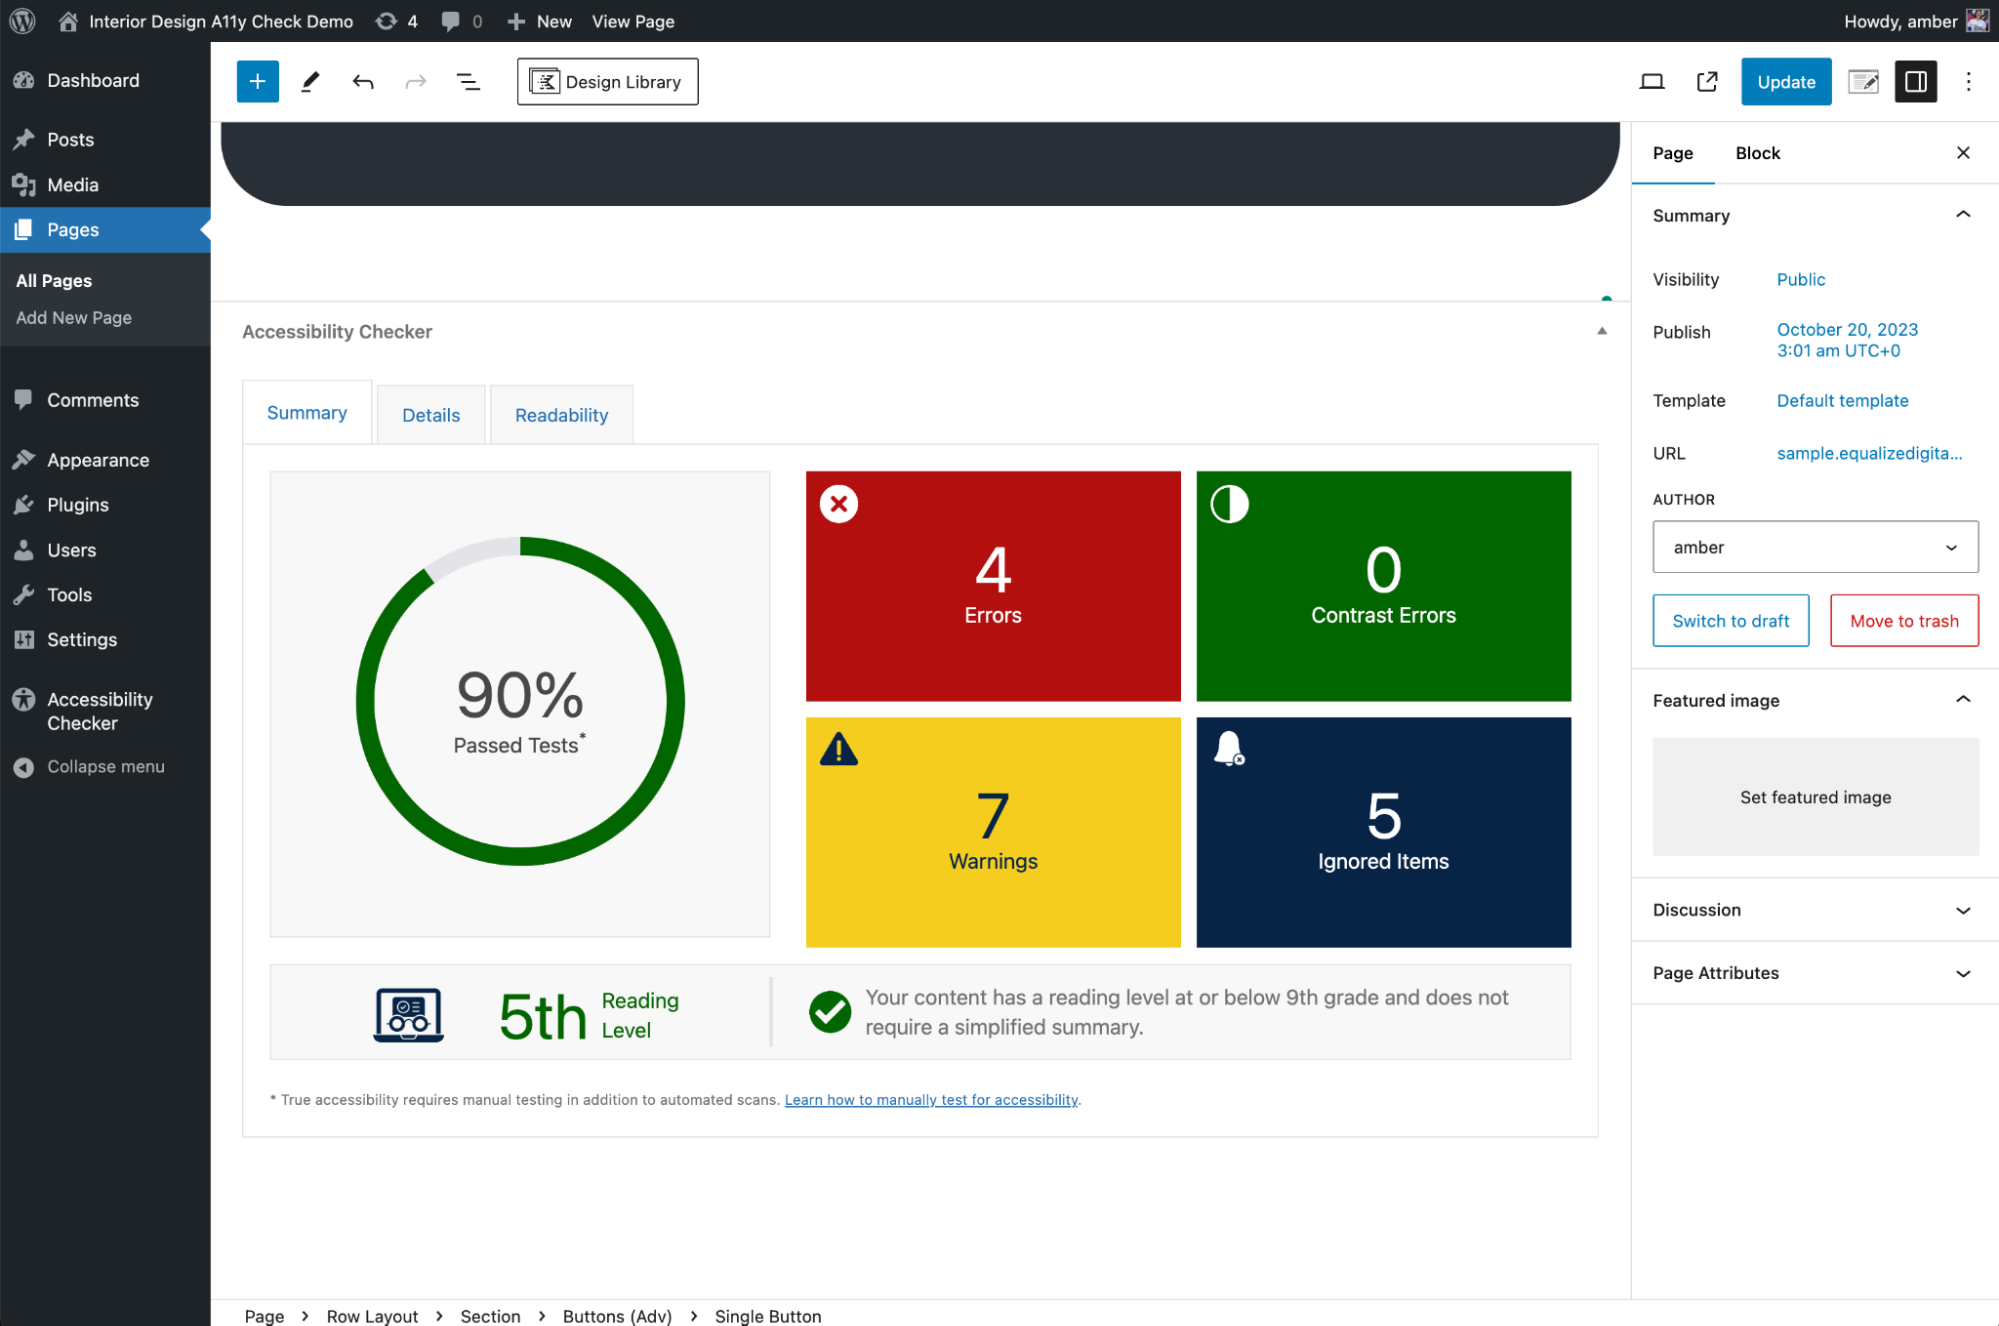
After you have installed and activated the plugin, go to the edit screen for your website’s home page and click the “Update” button without making any changes to the page. Updating the post will trigger Accessibility Checker to scan the page and generate a report.
After the scan runs, you can review the report below the content or, go to the front end of your website to vide the report.
To view the report on your website’s front end, click the Accessibility Checker button at the bottom right corner of the page.
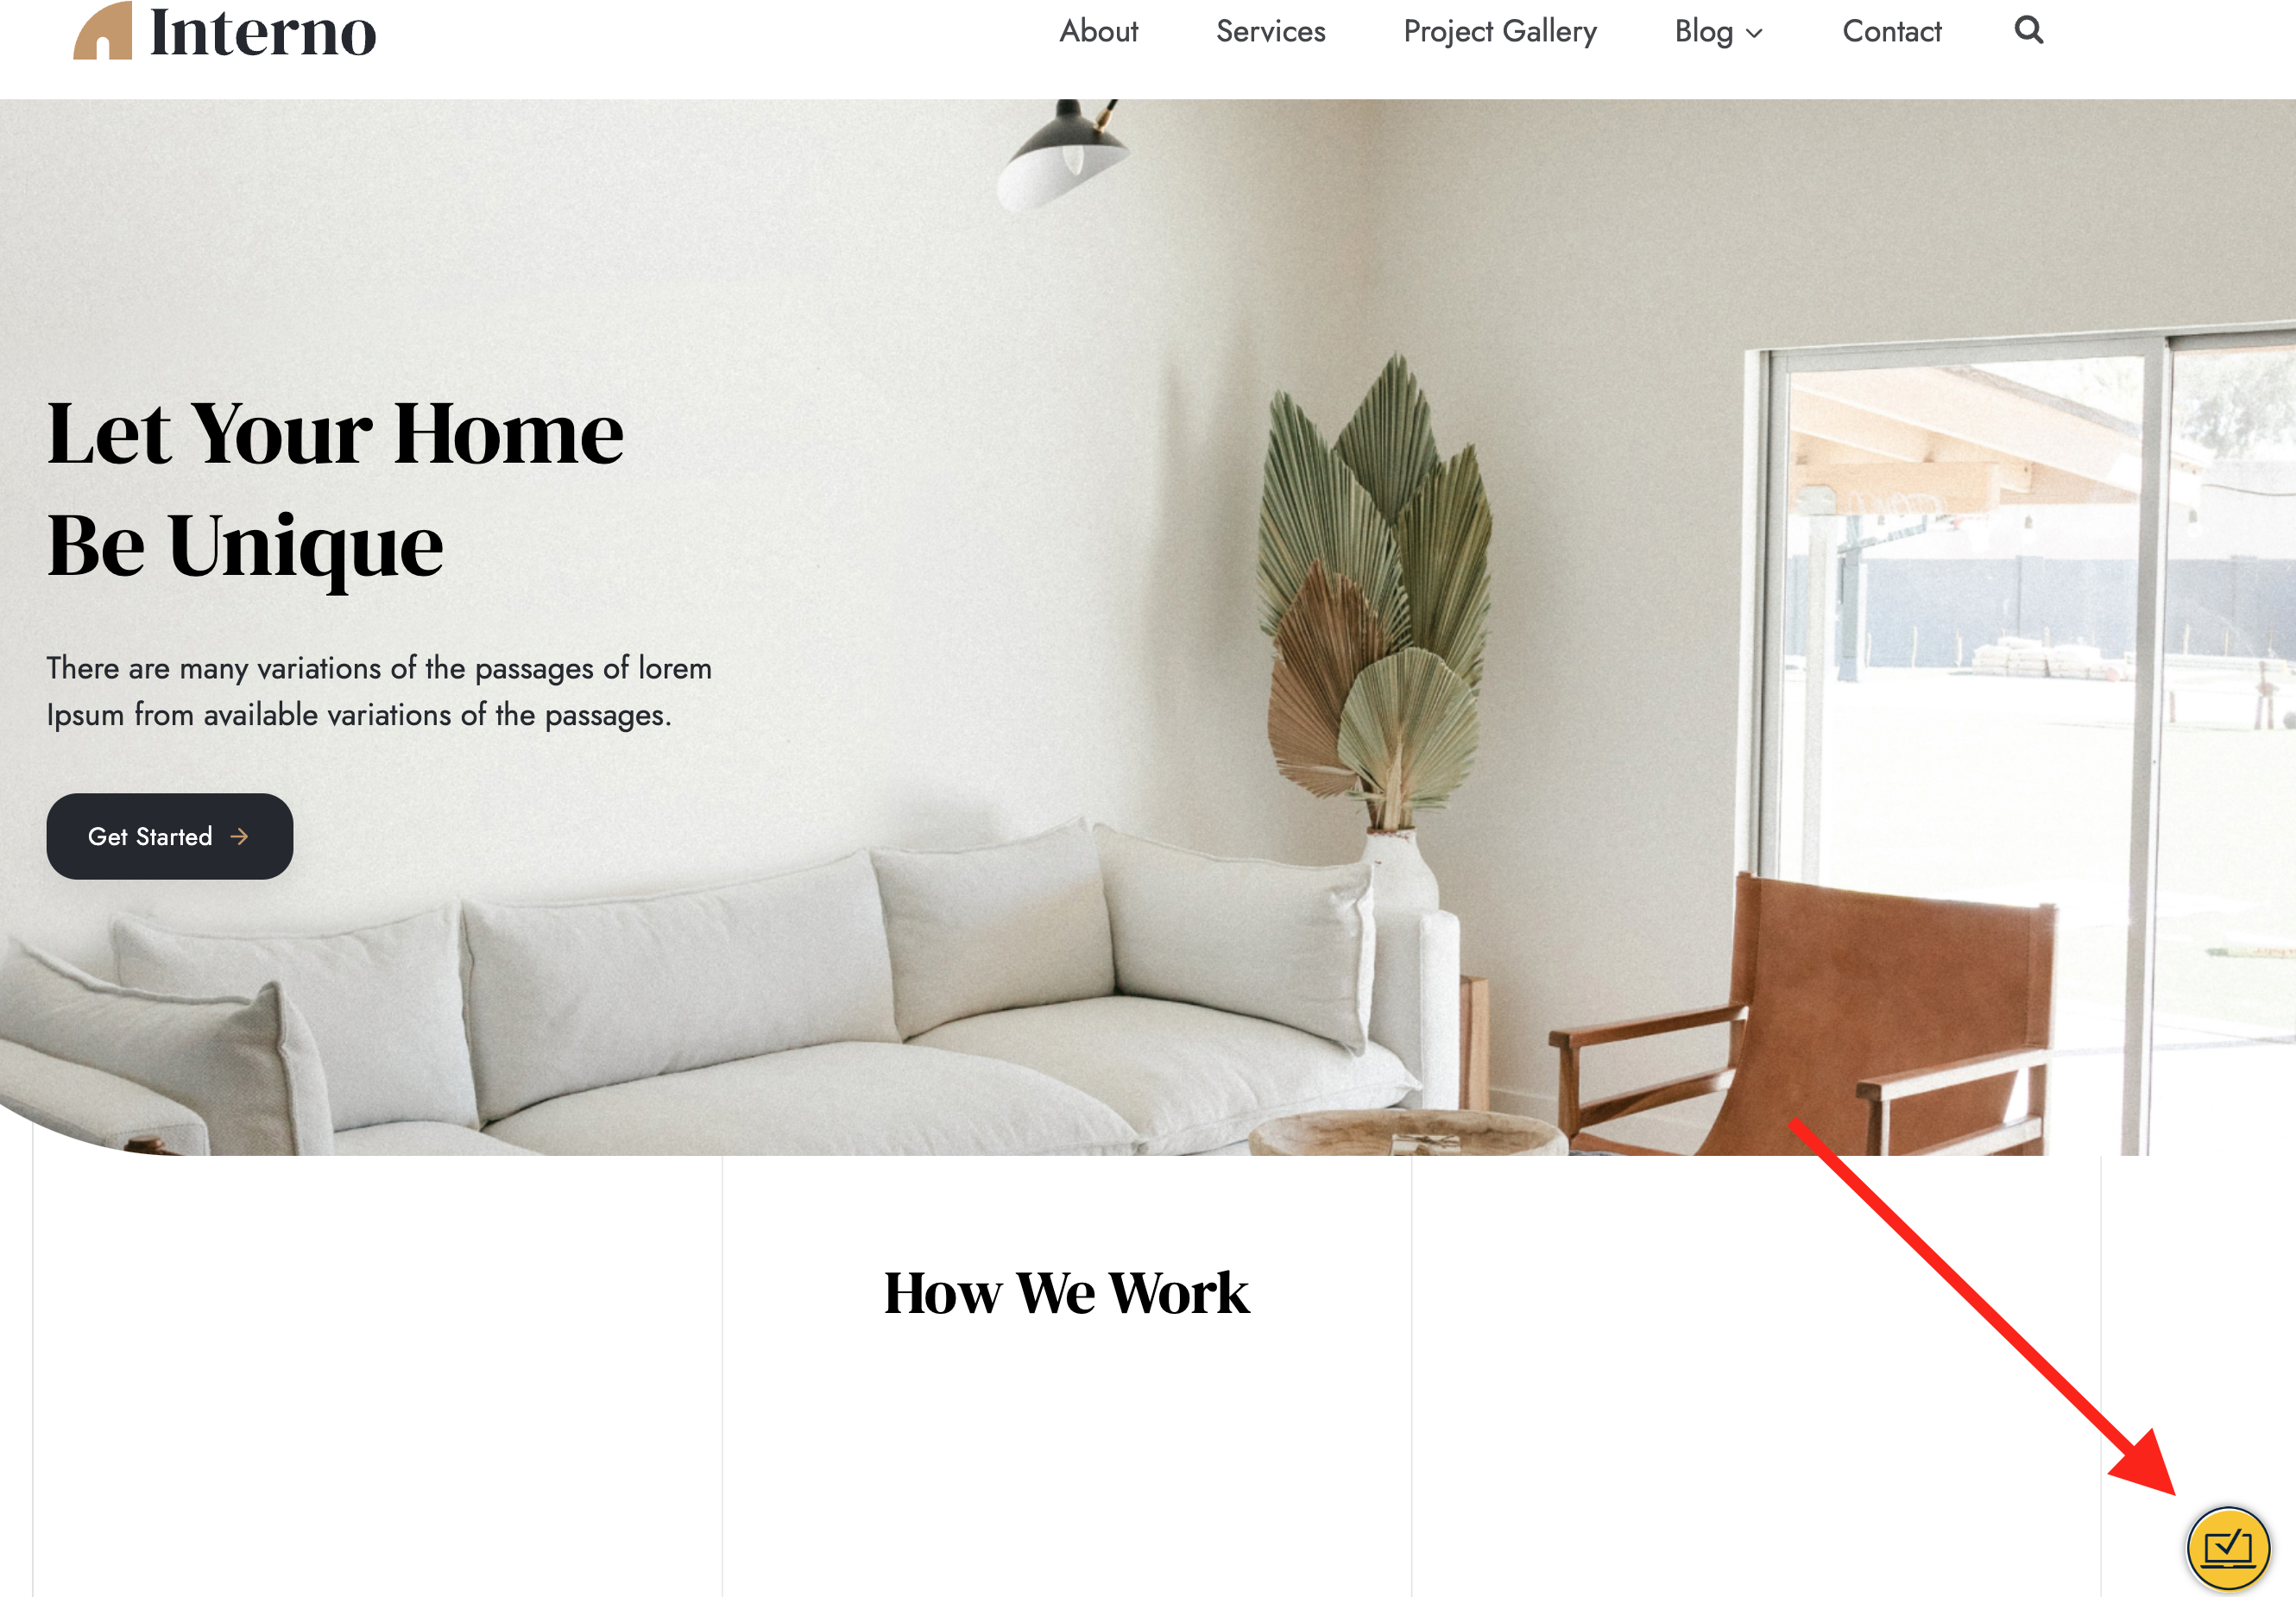
Clicking this button will open a panel that allows you to move through the accessibility problems found on the page and that includes information about the issue and how to fix it.
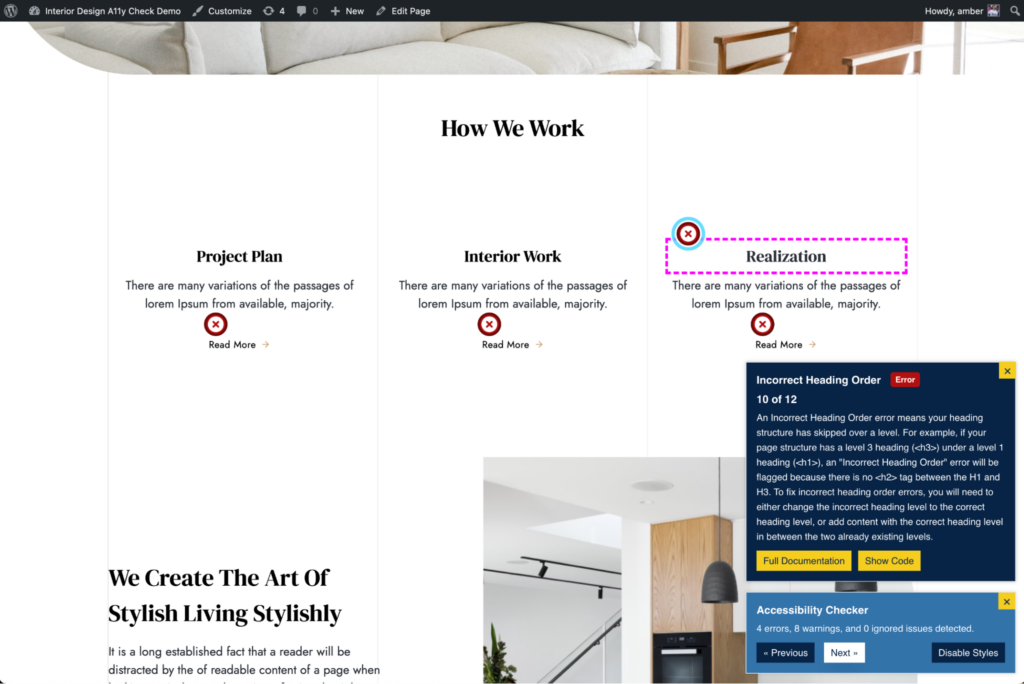
If you are unsure what to do about a particular problem, click the “i” icon (on the edit screen) or “Full Documentation” link (on the front end) to read articles explaining the problem and how to fix it.
If you need help making fixes, you may also want to contact a developer. Equalize Digital’s accessibility remediation plans are perfect for this if you don’t already have a developer on your team.
If you want to see a video demonstrating how to use Accessibility Checker, review our more detailed getting started guide.
Upgrading Accessibility Checker
If your website is more complex, with different content types (custom post types) in addition to the default posts and pages (such as products, events, or team members), or if you want full-page reports rather than viewing reports page-by-page, you may want to upgrade to a paid version of Accessibility Checker.
Accessibility Checker Professional, Small Business, and Agency plans include full site scans and reports by issue type.
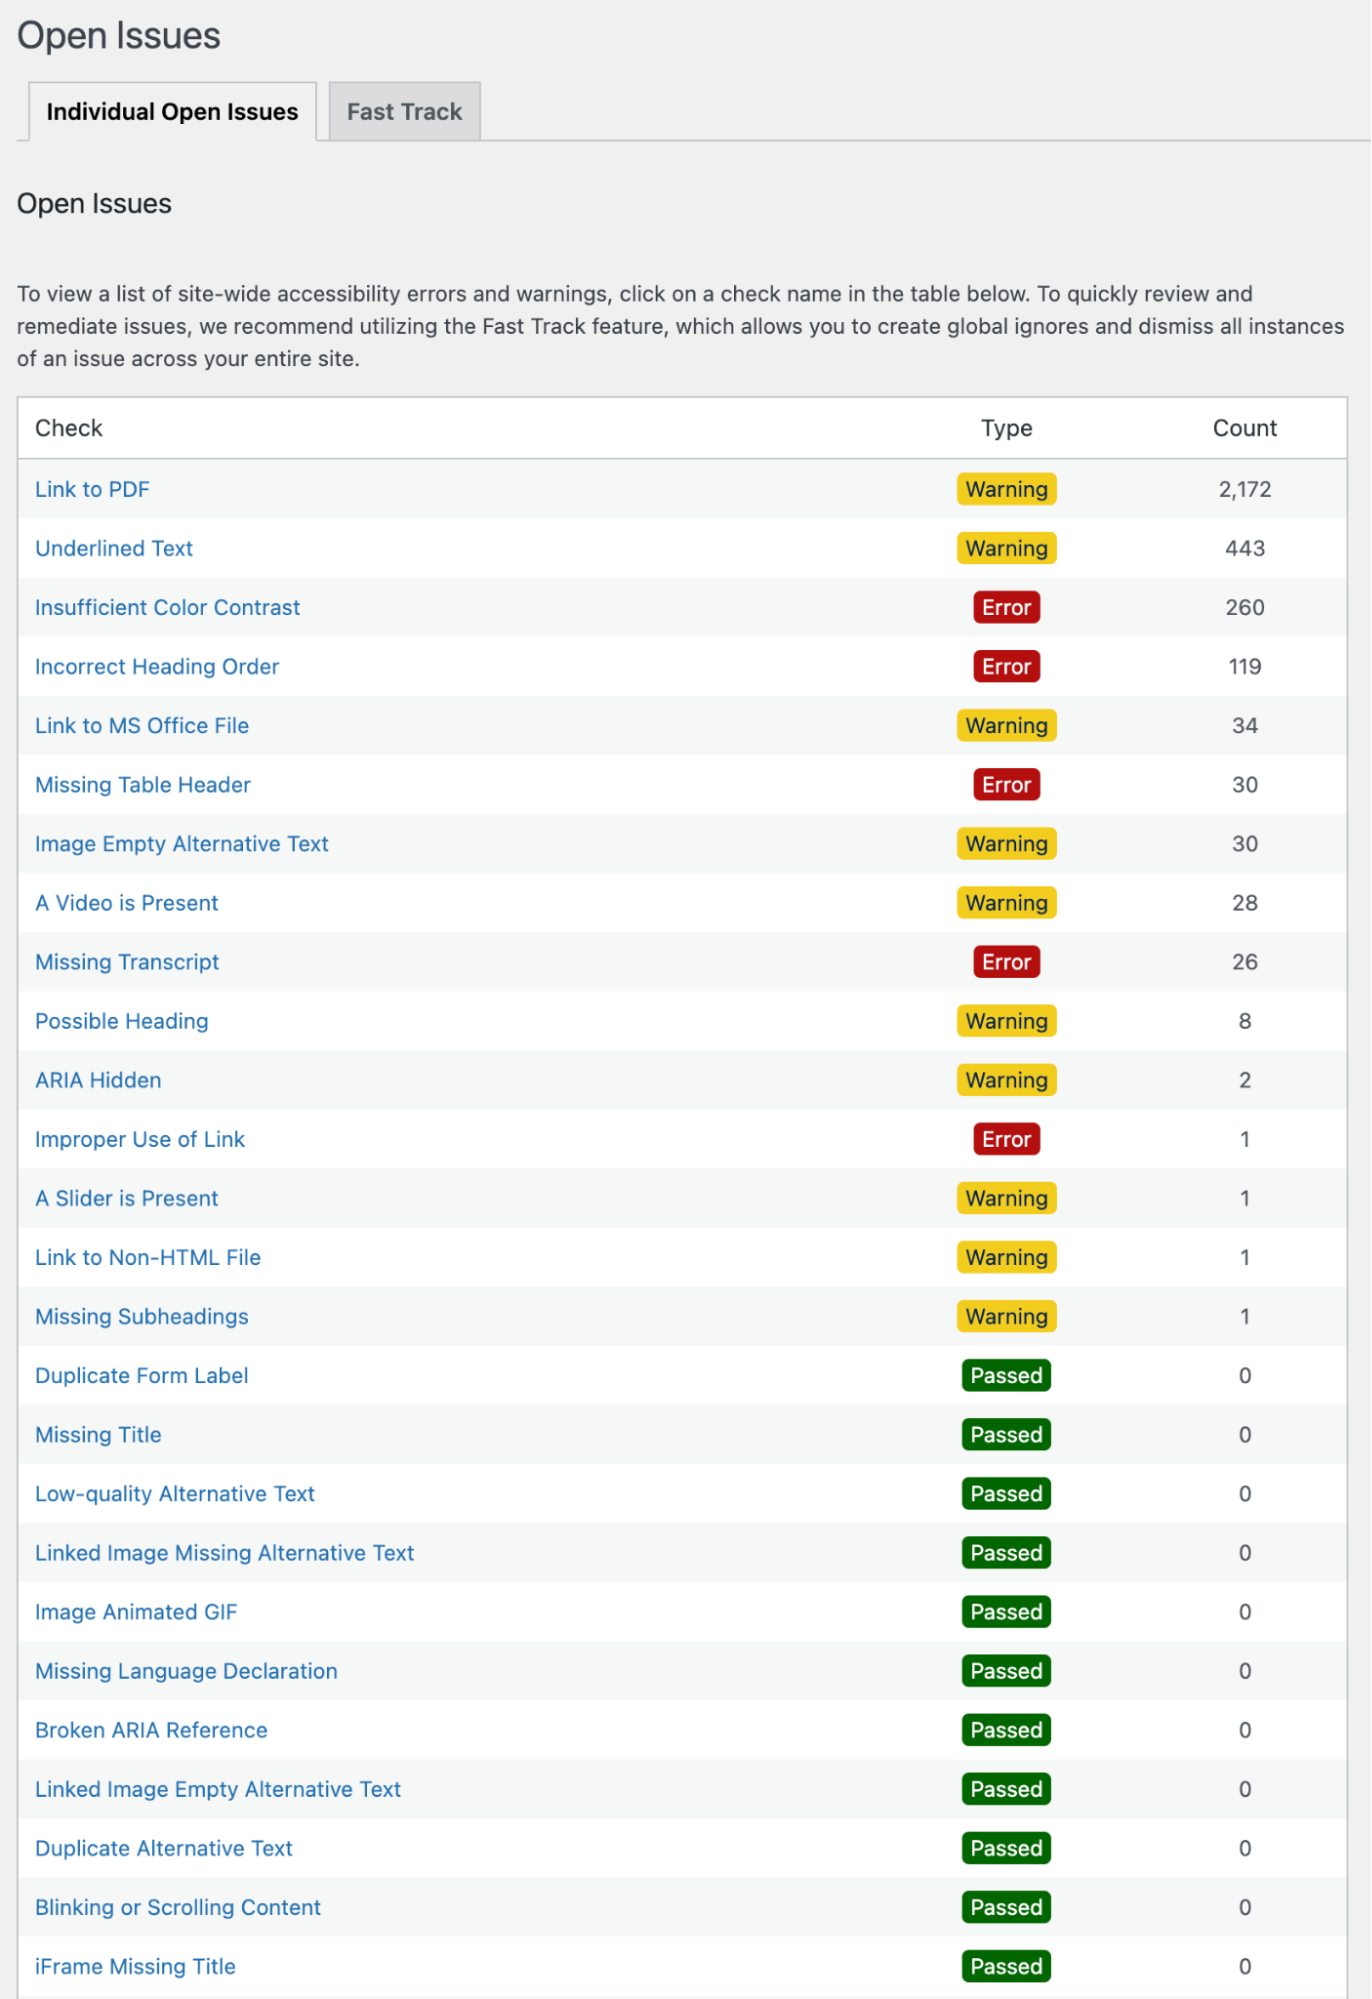
The open issues list in Accessibility Checker Pro can provide you a site-wide look at what problems might exist and allows your team to quickly find pages where problems exist without having to open them one-by-one. This list is also helpful for dividing up tasks. Delegate images missing alternative text, ambiguous links, and incorrect heading levels to content creators, and point your developer at more technical issues.
The Small Business plan also includes an Audit History add-on that allows you to track accessibility compliance over time.
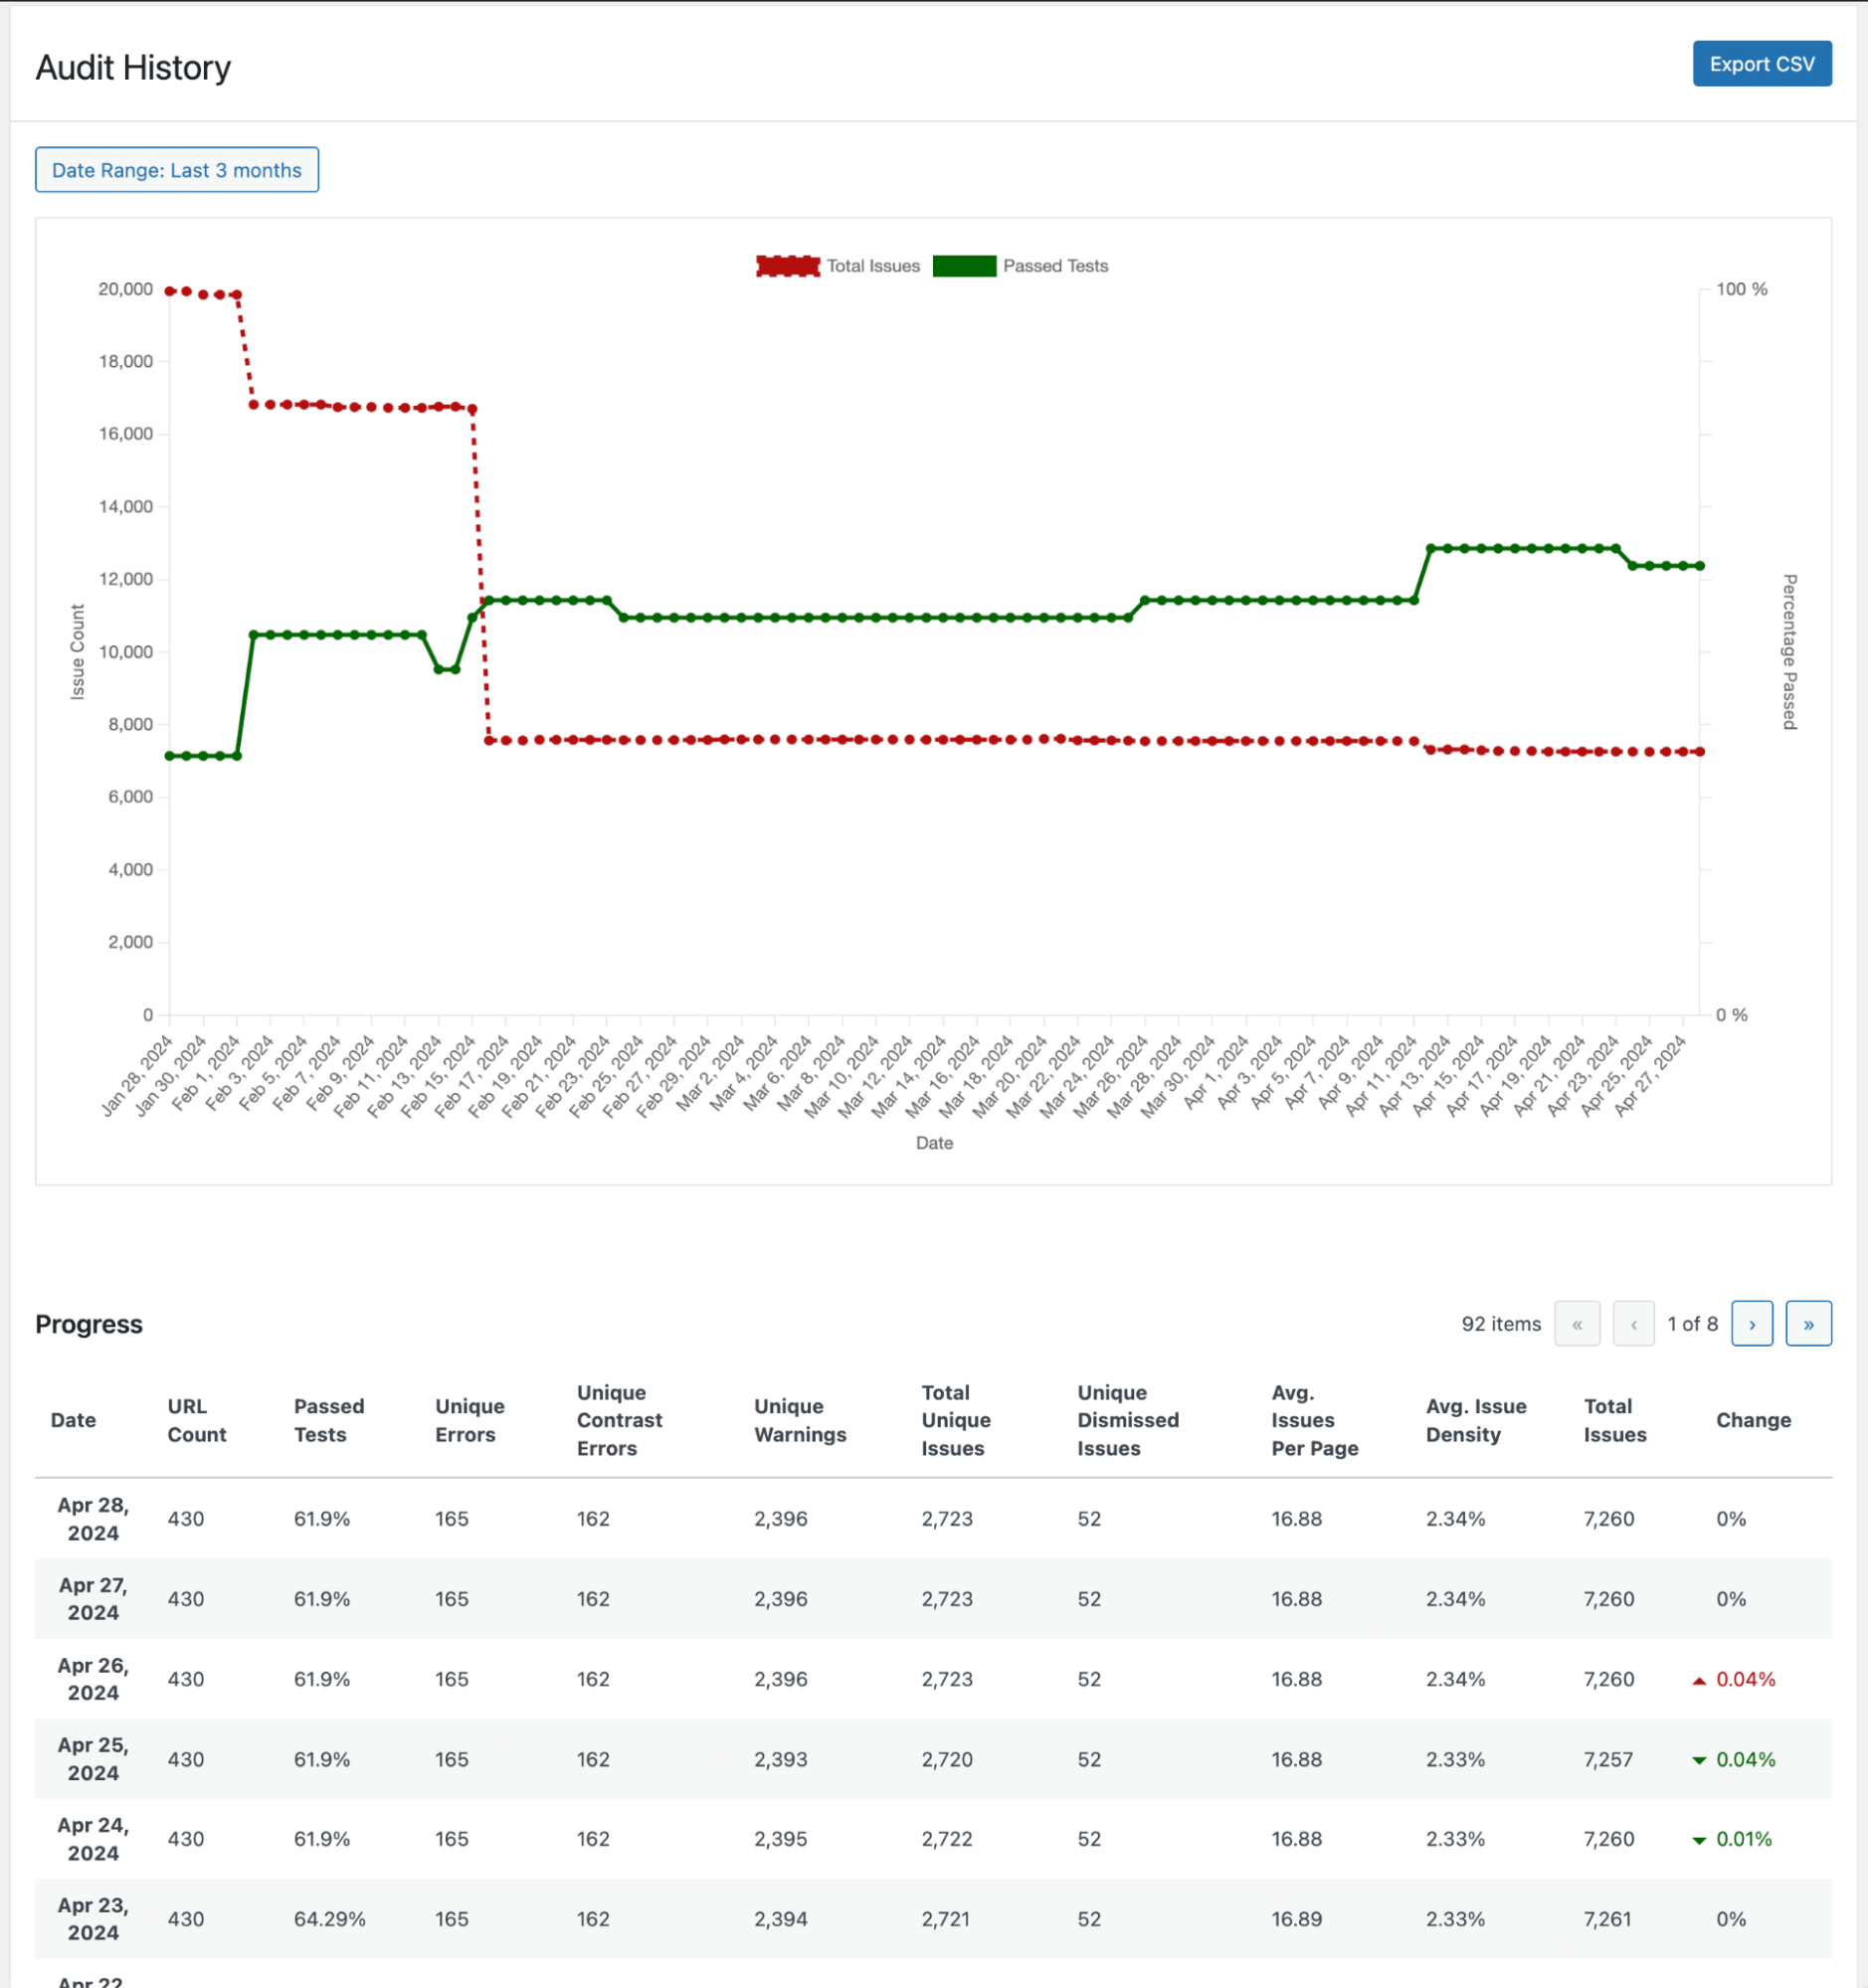
This add-on plugin is perfect if your organization is concerned with legal compliance or wants to track accessibility improvements over time.
Test with Browser Extensions
Browser extensions are a good option for running quick accessibility tests on a single page, especially if you don’t need to save the results or track changes over time.
You can install these extensions on any modern browser and run them on individual web pages with a single click. The findings will appear within a second or two. You can use browser extensions on any website, so you don’t need administrator-level access.
These are our two favorite accessibility testing browser extensions that we use every day.
WAVE Browser Extension
WAVE (Web Accessibility Evaluation Tools) from WebAIM offers automated checks similar to Equalize Digital Accessibility Checker but directly within the browser. There are WAVE browser extensions for Chrome, Firefox, and Edge.
Your content and development teams can use WAVE reports to find elements on your website that require accessibility improvements. It is also a valuable tool if you want to run a quick accessibility test on a website you don’t have admin access to. For example, WAVE can be helpful if you need to test the accessibility of a WordPress theme, plugin, or SaaS platform’s demo before selecting it for your website.
How to use WAVE in your browser:
- Go to the WAVE Browser Extension web page and follow the link to install the browser extension for your specific browser.
- Click the “Add to” button on the web store to install the WAVE extension in your browser.
- Once installed, you’ll see the WAVE icon in the browser toolbar (typically a “W” icon).
- Navigate to the webpage you want to evaluate.
- Click on the WAVE icon in the toolbar.
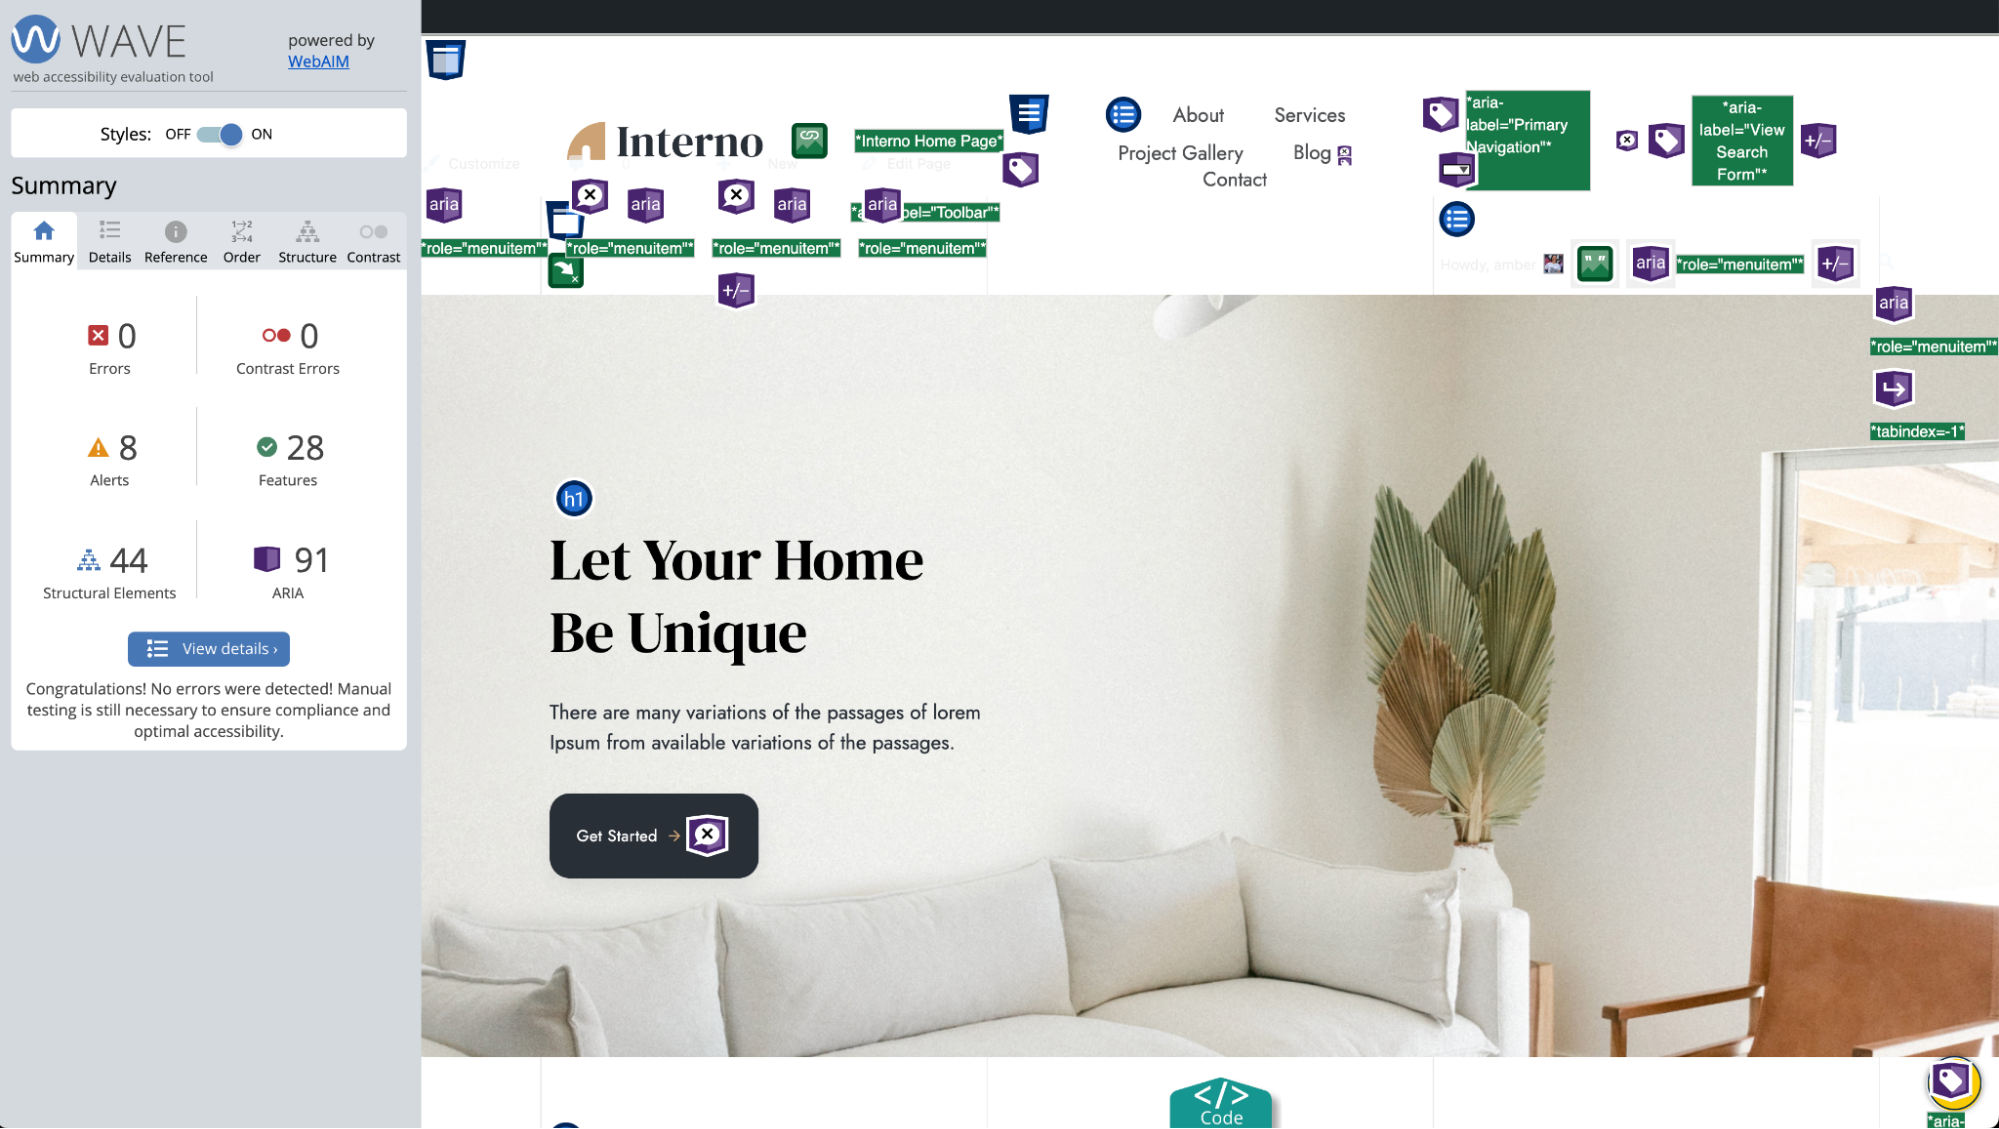
- A sidebar will appear on the left, displaying icons and information related to different accessibility problems or features, as shown in the screenshot above.
- Click on the icons or Details tab in the WAVE report to get additional information on what to do.
Visit the WAVE help page for more information on using WAVE and how to understand its reports.
HeadingsMap Browser Extension
Using headings in the correct order is very important for accessibility and search engine optimization (SEO). The HeadingsMap browser extension for Chrome and Firefox allows you to quickly see an outline of a web page’s headings to ensure that no headings are out of order and that the heading structure accurately reflects the outline of the content.
How to use HeadingsMap in your browser:
- Go to the HeadingsMap for Chrome or HeadingsMap for Firefox.
- Click the button to add the extension to your browser.
- Once installed, you’ll see the HeadingsMap icon in the browser toolbar (typically a “[h/]” icon).
- Navigate to the webpage you want to evaluate.
- Click on the HeadingsMap icon in the toolbar.
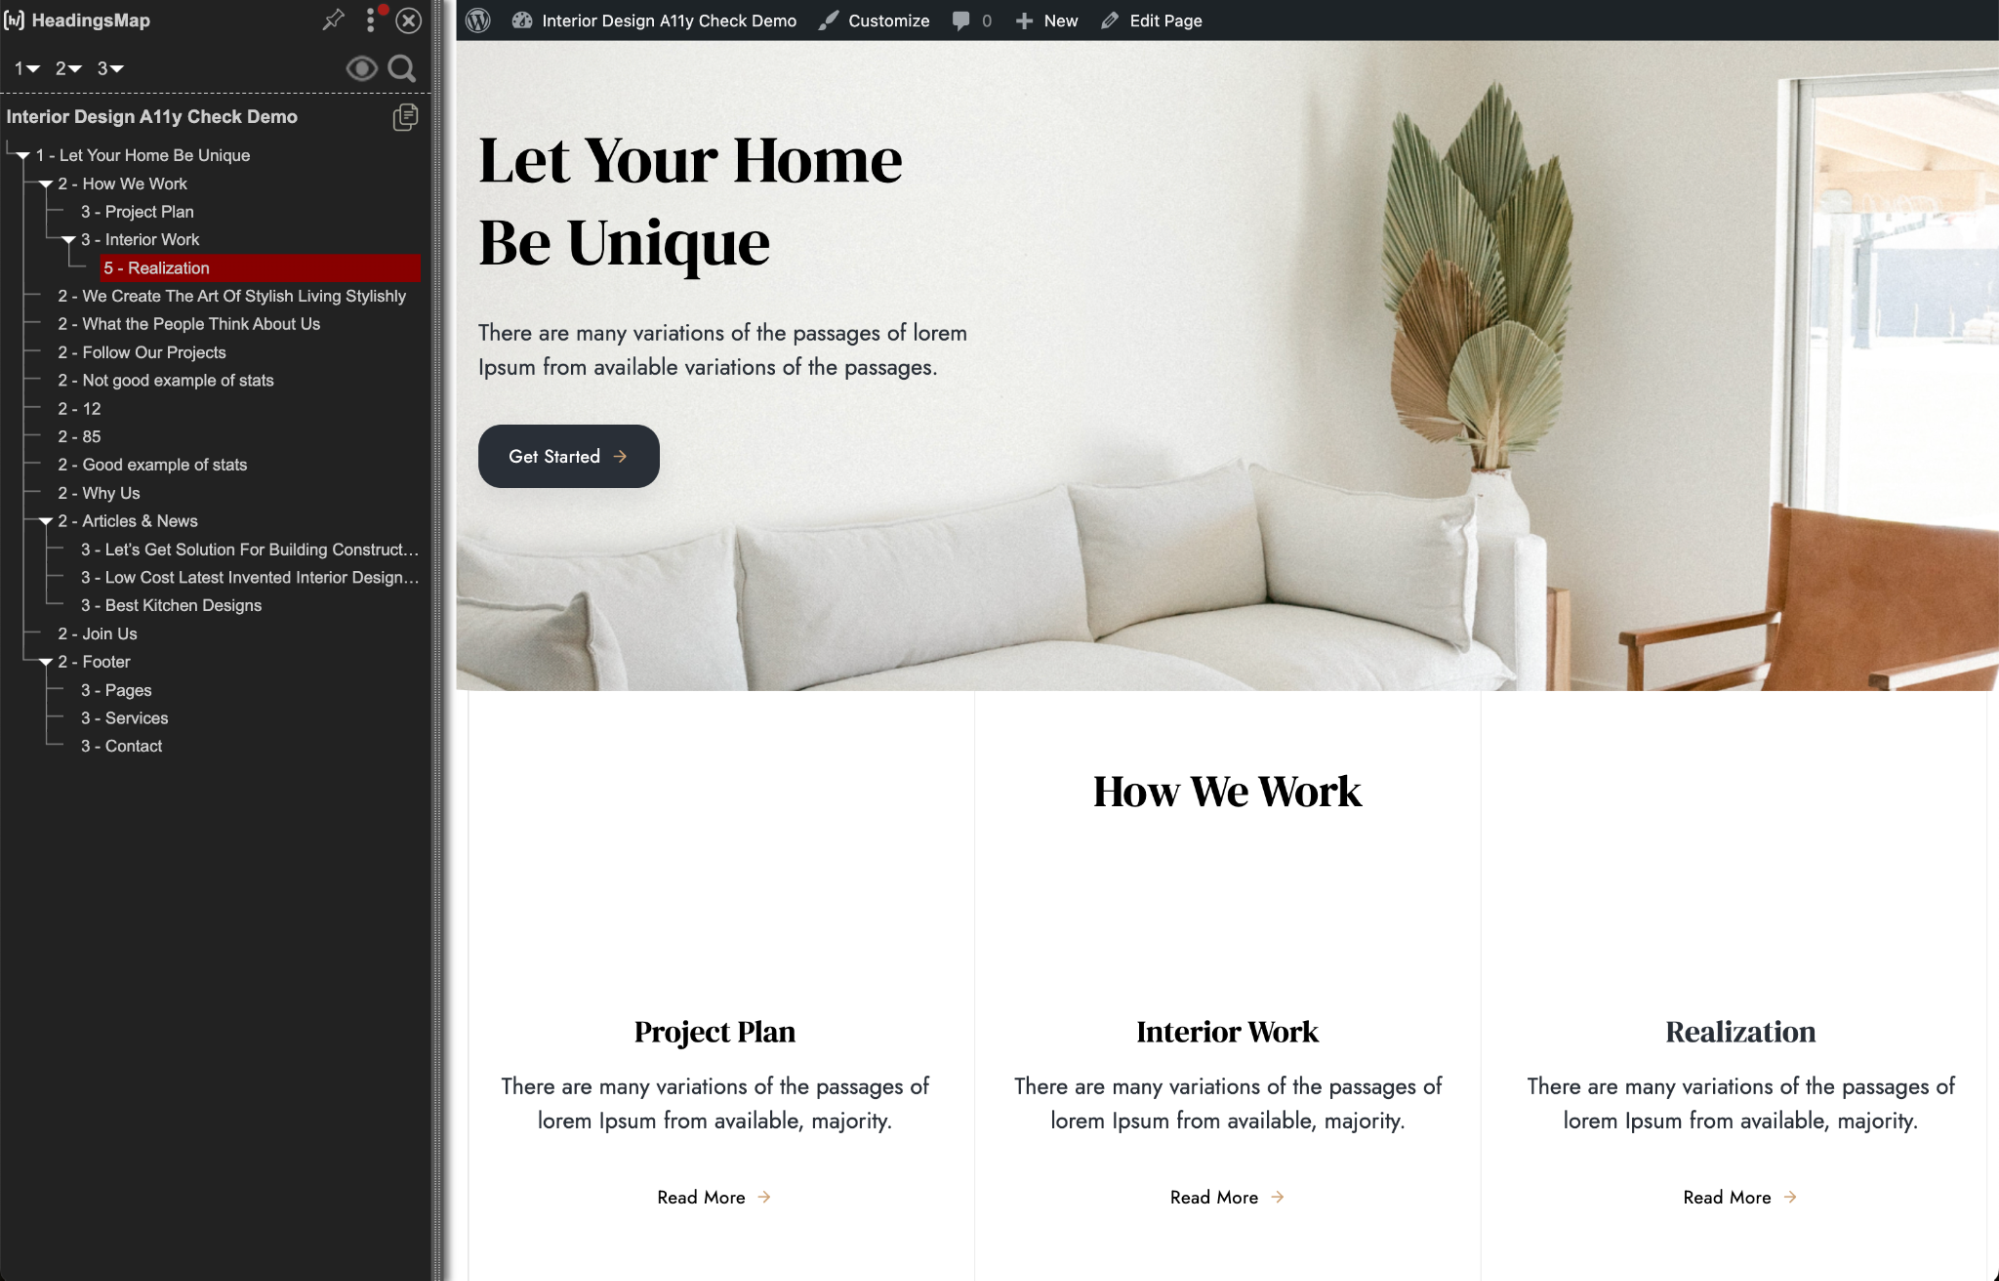
- A sidebar will appear on the left, displaying the entire heading tree for the webpage, as shown in the screenshot above.
- Assess the heading tree and ensure that:
- There are no skipped heading levels (these are highlighted in red).
- The headings’ nesting makes sense and conveys your intended meaning for the page.
Keyboard Test Your Website
Believe it or not, your keyboard is one of your most powerful testing tools, and anyone can keyboard test!
Testing with a keyboard means evaluating a website’s navigability using only the Tab, Spacebar, Enter/Return, and arrow keys. When keyboard testing, you ensure all interactive elements are reachable and operable without a mouse.
Why Keyboard Test
Keyboard testing can help identify a wide range of potential issues with a website’s user experience, particularly for individuals who do not use a mouse or trackpad.
People who cannot use a mouse include people who are blind or sighted but have limited mobility. They may use only keyboards or alternative keyboards to navigate the web. Ensuring your website can be used without a mouse is vital for these users.
Keyboard testing is also an important step in screen reader testing. Even if you don’t know how to use or test with a screen reader, you can get your website on the way to being accessible for blind people by fixing any problems identified via keyboard testing.
How to Keyboard Test
You don’t have to be an accessibility expert to keyboard test your website. You can do simple things to determine whether there are accessibility problems for keyboard-only users.
All you have to do is turn your mouse off, stick it in a drawer, and use your website with only your keyboard.
How do you do that? Navigate with Tab and Shift+Tab: Start by pressing the “Tab” key to navigate through interactive elements on the page. Use “Shift+Tab” to navigate in reverse order.
As you move through the page, verify that all interactive elements (links, buttons, form fields, etc.) are reachable and controllable. For example, you should check all sliders, accordions, tabbed content, embedded videos, or audio players. Ensure that the “Enter/Return” and the “Spacebar” keys can trigger buttons. Links should be triggered by just the “Enter/Return” key.
Basically, if you want visitors on your website to do a specific thing (read certain content, fill out a form, add a product to their cart and check out), then that needs to be possible with the keyboard alone.
Specific Things to Look For
When you’re keyboard testing, here are some specific things to look for:
Make sure you have a working skip link
The first thing you should find when you hit the Tab key on your website is a “Skip to Content” link. The skip to content link should appear in the top left corner of the website when you tab to it.

You should be able to hit the “Enter/Return” key on this link to jump past the header and into the content. If this link is not present or triggering it does not move you to the content area, that’s a problem.
Check focus indicators:
Ensure each focused element has a clear visual indication or outline as you tab to it. The focused element should be visibly highlighted, making it apparent which part of the page is currently active.
The focus outline should be clearly visible (including for low-vision users) and pass color contrast with the background. You should never feel lost or confused about where you are on the page as you hit the Tab key.
Watch for hidden elements getting focus
This is the second part of never feeling lost or confused when tabbing through a website.
As you’re tabbing through the page, only visible elements should receive focus. If elements in a carousel, tabbed content, or navigation menu are hidden from view, you should not be able to tab to them. If you tab to a hidden element, and it becomes visible, that’s fine. But if you tab to a hidden element and it stays hidden, that is a problem.
You’ll know you tabbed to a hidden element because the focus outline may disappear. After hitting Tab one or more times, it will reappear on the next visible link or button.
Test dropdown menus
If your website includes dropdown menus in your navigation, navigate to them (and through them) using the keyboard. Confirm that the menu items are accessible and visible when focused. You should be able to use your entire navigation menu with only a keyboard.
As a second step here, zoom your browser in 200% to simulate how a low-vision user might be experiencing it. This will make your mobile navigation menu appear. You need to test and confirm that your mobile navigation menu can be used with only a keyboard as well.
Watch for keyboard traps
Keyboard traps occur when there’s a bug in the code that prevents users from navigating away from an element.
Users should always have a clear path through the entire website. If you hit Tab and cannot move beyond an element even though there is content below it, that is considered a keyboard trap.
Pop-ups are typically the #1 cause of keyboard traps, but other elements can also cause keyboard traps. Look for places where you get stuck and can’t move forward or for popups that open but don’t capture focus, leaving you stuck on the page below it without any way to interact with the popup.
When to Consult a Professional
This article aims to highlight some ways you can get started with finding and fixing accessibility problems. It is our hope that accessibility testing seems less scary and mysterious now and that you’re inspired to run some quick tests on your website right now.
When to Get Help with Testing
Many serious accessibility problems can be easily identified with the tools and methods described above, and even if you only fixed the things you found with these tools and methods, your website would be meaningfully more accessible.
However, while automated testing tools offer efficient baseline accessibility testing and non-technical users can identify many problems via basic keyboard testing, a comprehensive evaluation of accessibility requires manual testing by a trained professional.
Trained accessibility professionals deeply understand Web Content Accessibility Guidelines (WCAG) and web accessibility best practices. They also know how to use screen readers and will test your website for accessibility with one or multiple screen readers (the assistive technology used by blind people).
If you need true WCAG conformance and don’t want to learn the ins and outs of WCAG, or if you’re legally required to have an accessible website, hiring a professional accessibility tester to audit your website can save you a lot of time and get you on the path to legal compliance.
DIY testing is a great place to start, but if you want to avoid a lawsuit, fine, or accessibility complaint, you may want to hire a professional to help with testing and provide recommendations for prioritizing fixes.
Getting Help with Fixes
Many accessibility fixes can be made directly in the WordPress editor. However, some accessibility problems are caused by your theme or plugins and may require a developer to fix them.
If you don’t have a developer on your team and are not a code ninja yourself, you’ll want to find a partner to help with these more difficult or code-related fixes. Our accessibility remediation plans provide remediation development support with the flexibility to spread out costs over time.
Just need one-off dev assistance? We highly recommend Codeable, a premium WordPress development service that allows you to contract developers for one-off or smaller projects.
Start Testing Today
Start your journey to accessibility compliance and reach all prospective customers with an accessible website. Whether you’re going to handle fixes in-house or find a partner to help, the first step to making your website accessible is testing.
You can’t fix what you don’t know is broken.
Try one of the tools above or spend 5 minutes accessibility testing your website, then make a plan to fix one problem you identified.
Accessibility happens with one fix at a time. Whether you’re a developer new to accessibility, a content creator, or a website owner, the most important step is just getting started.