If you’re committed to building an accessible WordPress website, choosing the right plugins is crucial. If the plugins added to your website aren’t designed with accessibility in mind, they can create significant barriers for users with disabilities, putting your organization at risk of a lawsuit or fine.
Before you purchase a plugin, it’s essential to test its accessibility to ensure it aligns with WCAG (Web Content Accessibility Guidelines) and other accessibility best practices. Accessible plugins ensure your website functions for all users and reduce costs in the long run, because you won’t have to pay a developer for remediation services. Accessible plugins have better underlying HTML markup and can also help improve your website’s performance, search engine ranking, and security compared to inaccessible alternatives.
Not sure what to look for when assessing a WordPress plugin for accessibility? This article walks through how to test a WordPress plugin for accessibility before you buy it.
1. Check for Accessibility Documentation
Once you’ve identified a plugin that meets your needs from a feature perspective, start your accessibility assessment by reviewing the plugin’s documentation and support pages. Look for explicit mentions of accessibility features, WCAG compliance, or implementation of ARIA (Accessible Rich Internet Applications).
Developers who prioritize accessibility often provide details about their efforts, and finding accessibility information in plugin documentation is a good sign. As noted in our WordPress Cookie Banner Accessibility Lies article, you shouldn’t always take documentation at its word, though, as it may be outdated or inaccurate. It’s essential to test the plugin yourself to confirm accessibility.
Article continued below.
Stay on top of web accessibility news and best practices.
Join our email list to get notified of changes to website accessibility laws, WordPress accessibility resources, and accessibility webinar invitations in your inbox.
2. Test the Plugin Demo Website
If the plugin has a demo website, use it to perform accessibility tests before installation. Apply the following techniques:
- Automated Accessibility Scan: Run tools like WAVE, axe DevTools, or Google Lighthouse to identify common accessibility issues.
- Keyboard Navigation: Ensure all interactive elements (buttons, menus, forms) are accessible via the keyboard (Tab and Shift+Tab keys).
- ARIA Landmarks and Labels: Inspect the plugin’s output using a browser’s developer tools to see if it includes ARIA attributes and semantic HTML.
- Screen Reader Compatibility: Use a screen reader like NVDA (Windows) or VoiceOver (Mac) to check if the plugin’s interface is navigable and properly announced.
Not sure how to start manual accessibility testing? Learn how to manually test for accessibility here.
Take an online course to learn screen reader testing
If you want to learn more about how to use a screen reader for accessibility testing, check out our online courses. These courses include detailed instructions on how to use a screen reader, key keyboard shortcuts to know, recommended settings for testing, and examples of both good and bad components, so you know what to listen for.
Know what matters
When testing a WordPress plugin demo website for accessibility, it’s important to note that the plugin will not cause all accessibility issues you encounter on demo sites. Many accessibility issues may be caused by the demo site’s theme and be irrelevant to your review of the plugin.
Issues likely related to the theme include color contrast errors and missing focus states. If you know how to, inspect the code when encountering an issue to determine if it comes from the plugin or the theme. Some problems are minor or easy to fix on your website and are not “deal breakers” when purchasing a plugin. See the What’s Easy to Fix vs. What’s Difficult section for a discussion of these items in greater detail.
How to add focus indicators on plugin demo sites
A common accessibility problem on plugin demo sites is missing focus indicators. It can be very difficult to accessibility test a plugin’s demo if you can’t see where you are when tabbing through the page. Here’s how to add visible focus outlines on a website you don’t own, so missing focus indicators don’t block you from being able to test a plugin’s accessibility.
Add focus indicators with a browser extension
There are several browser extensions that will add focus indicators on websites that lack them.
The Focus Indicator Chrome extension adds a visible focus indicator automatically to every website when you activate it. For testing purposes, you’ll want to switch it to “whitelist mode”, which allows you to set the focus indicator to only show on specific websites instead of all websites.
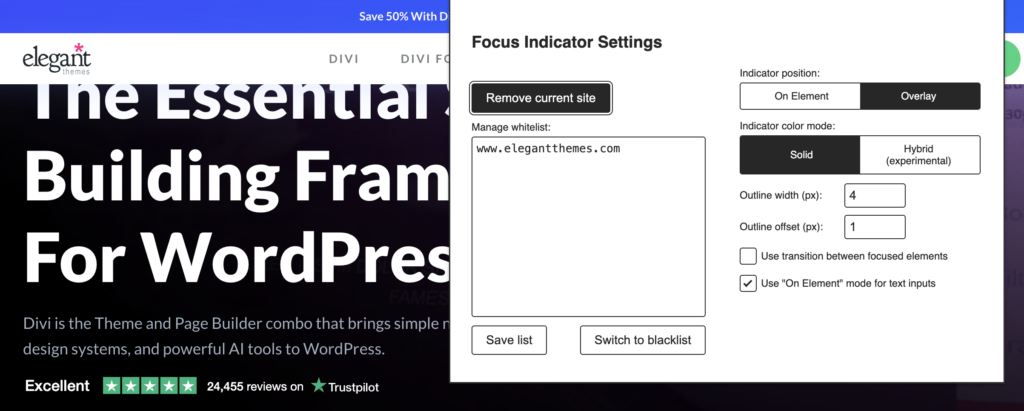
There are also settings in the extension for defining the outline width and offset. The outline will automatically switch between black and white depending upon background color to ensure good color contrast.
Another helpful browser extension is the NerdeFocus Chrome extension. This extension doesn’t add focus outlines by default, but adds a control panel in dev tools with a checkbox for turning on a focus outline and setting for defining the focus outline color.
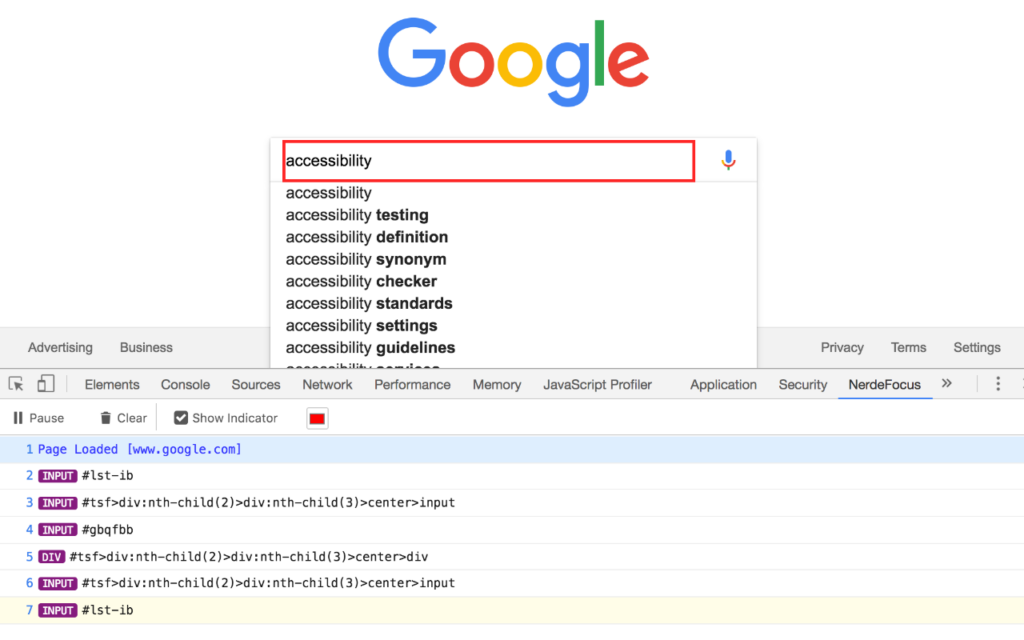
NerdeFocus also has the ability to record as you tab through the page and generate a list of elements receiving focus. This is especially handy on sites where hidden elements are receiving focus.
Add focus styles in dev tools
If you’re testing a single page and don’t want to use a browser extension, you can also add a focus outline by adding styles in the browser dev tools CSS inspector.
To add styles in Chrome Developer Tools, for example, you start by opening the Elements panel and inspecting an element. Click on the plus icon in the top right corner of the Styles panel to create a new stylesheet. This will add a DOM selector to a new stylesheet called “inspector-stylesheet”. You can then edit this stylesheet directly in the source editor, similar to how you would in any code editor.
All you need to add to force a focus outline is this:
* :focus {
    outline: 2px solid red !important;
    outline-offset: 2px !important;
}
Note: if you set a focus outline this way, it will be lost if you navigate to another page or refresh the current page. This is an option that works on the fly, but a browser extension may be more convenient.
3. Look for User Reviews
After accessibility testing the plugin demo, it’s always a good idea to check user reviews for support requests. User reviews and support requests can reveal accessibility issues that others have encountered and let you know how the plugin developer responds to accessibility problems when identified.
If the plugin has a free versions on WordPress.org, check the reviews and support forum there. If the plugin has an open repository on GitHub, check the GitHub issues for anything relevant to accessibility. Make sure to look at both open and closed issues or support forum posts.
If the plugin isn’t on WordPress.org or GitHub, try doing a Google search for keywords like “accessibility,” “screen reader,” “keyboard navigation,” or similar terms in combination with the plugin name to see if users with disabilities or other users have reported any problems elsewhere.
4. Test the Plugin on a Staging Site
If a free version is available, install the plugin on a staging site and test it there, away from your live website.
Run Accessibility Checker on the staging site and scan pages with the plugin’s blocks or shortcodes on them or test any posts created by the plugin. Then, repeat the manual testing steps described above. This will help you to identify accessibility issues that may be caused by the plugin on your specific WordPress website.
Some accessibility issues may not be identifiable until you test the plugin with your theme and other plugins. You may discover that a plugin that seemed OK on its demo is going to require extra styles, PHP functions, or JavaScript to be added to your theme before it can be used on your live site.
5. Contact the Plugin Developer
If the documentation doesn’t mention accessibility, reach out to the plugin developer. Ask if the plugin has been tested for accessibility and if they follow WCAG guidelines. A responsive and knowledgeable developer indicates that they care about inclusive design.
Even if a plugin is accessible now, regular updates and maintenance are necessary to keep it compliant. Check how frequently the plugin is updated and whether the developers address accessibility concerns in their changelogs.
If you can’t find accessibility information in their documentation or changelogs, it’s important to reach out to developers to ask about their approach to accessibility. You should do this even if the plugin looks generally accessible.
Why is this important? It’s important because with every update a plugin could be introducing accessibility issues to your website. If you’re going to invest in a paid plugin for your WordPress website, you want to be sure that it’s responsibly maintained and that accessibility testing is part of the developer’s processes.
What’s Easy to Fix vs. What’s Difficult
As mentioned above, not all accessibility issues are dealbreakers. Some are relatively easy to fix with minor CSS or settings adjustments, while others require in-depth PHP and JavaScript knowledge. Here’s a breakdown:
Easy to fix (can often be ignored when choosing a plugin)
Some examples of things that are very easy to correct with only basic CSS knowledge include:
- Color contrast issues: Many contrast problems can be resolved with custom CSS or adjusting theme settings.
- Missing alt text on images: If the plugin allows you to add alt text manually, this is an easy fix.
- Font size and spacing: Custom CSS can usually address these issues without modifying the plugin code.
- Keyboard focus outline styling: If focus indicators are missing or unclear, they can often be added via CSS.
Difficult to fix (may be a red flag)
These issues are more difficult to fix in a plugin that cannot be edited directly.
- Lack of keyboard navigability: If essential controls (menus, buttons, form fields) aren’t accessible via the keyboard, this often requires modifying the plugin’s output with either a PHP template or filter, or JavaScript on page load.
- Non-semantic HTML structure: If the plugin uses divs and spans instead of proper heading, table, list, or landmark elements, restructuring the output to use semantic HTML may require significant PHP or JavaScript code corrections.
- ARIA misuse or lack of ARIA attributes: ARIA roles and attributes should be correctly implemented; fixing them requires understanding how they interact with assistive technologies and strong JavaScript knowledge.
- JavaScript-driven interactions without accessibility support: If modals, sliders, or dropdowns don’t function properly with a screen reader or keyboard, fixing them can be complex.
Fixing problems like these require advanced developer skills. If you’re a WordPress designer, content creator, or website owner problems like these should be considered a red flag for buying the plugin because, in addition to buying the plugin, you’ll also have to pay a developer to fix it.
Even if you’re an experienced developer, think twice about buying WordPress plugins with problems like these. If the plugin lacks hooks and filters or doesn’t have support for templating built into it, it may be impossible to resolve major accessibility problems. It also may take way more time to fix accessibility issues than you bargined for.
Final Thoughts
Investing in a WordPress plugin can be a big decision. Even buying a plugin that seems like an “easy” way to add functionality to your site, should be carefully considered from an accessibility standpoint.
Taking accessiblity into consideration when deciding which plugin to buy saves your organization time and money in the long run while ensuring the best experience for all users on your site. By following the accessibility testing steps described above before purchasing, you can avoid accessibility barriers and make informed decisions that align with your website’s accessibility goals.
Not sure if a plugin is a good investment from an accessibility standpoint or unsure about accessibility testing it? Still have questions? Try asking for opinions in the WordPress Accessibility Facebook group. It’s a great place to get accessibility feedback on WordPress plugins and themes.
Already have a plugin on your website that needs remediation? Contact us to learn more about our remediation services.